Skip to main content Skip to search Skip to main navigation
EXTRA 20% off Outlet*. Use Code: EXTRA20 at checkout!!
+49 2151 820200 Mon-Fri 9 am - 6 pm, Sa 9 am - 1 pm

Tipps und Tricks


Here you will find valuable advice and instructions for model building and tuning remote-controlled cars. Whether you're a beginner or an experienced modeler, our expert tips on painting, fuel mixing, and vehicle setup will help you get the most out of your model. Dive into the fascinating world of RC modeling and discover new ways to take your skills and your vehicle to the next level.

Painting a polycarbonate body shell


Introduction
This guide will give beginners and experienced modelers an aid to help to apply a smart and durable design to a precious body shell. It aims to help avoiding mistakes, so that the joy of the self-made design will last as long as possible.

Basics
There are two different methods to paint a polycarbonate body shell, either with spray cans or with an airbrush. The priority here should be addressed to working with spray cans, because approximately over 90% of all car bodies are painted with spray cans!

Spray cans
Quick and easy painting is the biggest advantage of the spray can. With spray cans large areas are done quickly, you don‘t have to clean up any paint guns. Sometimes the can ridiculed as a beginner‘s tool. However, when painting with a can is properly mastered, really amazing results can be achieved.

RC-Paint Spray Gun

Convert your spray can into a spray gun. The long-lever system of this handle makes using a spray can much more convenient and provides better flow rate control as well.

A few words about health ...
Even though it is common sense we‘ll address it here briefly again. Use respirators when painting, no matter what kind of paint you use. There‘s no need for a professional mask with removable filters. A mask that covers nose and mouth ranges will do. The suspended particles will be effectively retained.

In this context, our product is recommended for Lexan RC Paint color. This is in contrast to many other populated special Lexan lockups, environmental and Physiologically acceptable propellant.

Two rules:

  • Wear a respiratory mask for every paint job, even small ones.
  • 2. Paint in a well ventilated area, or better yet outdoors.

Equipment

Preparation of the workplace
Since you certainly want to achieve a proper result the paint booth should be as clean and dust free as possible. Otherwise, fine dust particles will settle on the body shell and affect the outcome. Of course spray mist removal by suction would be best, but who has that kind of equipment available!? Compressed air spray cans work fine for dust removal as well.
You should also have available:

  • Kitchen roll or a lint-free cloth
  • Isopropyl or cleaner‘s naphtha. Do not use spiritus under any circumstances, because this removes the plasticizers from the body shell!
  • The previous day‘s newspaper. You may still want to read today‘s issue...
  • y0544 Abrasive fleece Microfine Gold Pads
  • Schneider Permanent marker
  • Compressed air spray
  • Scissors for polycarbonate, curved or straight
  • A cutter knife or a pointed scalpel with a new sharp blade.
  • A step drill or a conical reamer
  • Use only high quality masking and edge tape
  • The selected color RC 1005 to RC 1014 (RC-Paint polycarbonate paint is known to be very economical! A 150 ml can lasts - depending on the intensity of the paint application - for one 1/8 scale body shell or about two in 1/10 scale. Usually two to three cans will do for a 1/6 or 1/5 body shell)
  • Respiratory
  • y1481 RC-Paint Spray Gun

Preparation of the body shell
Before starting the actual painting some preparations are necessary to prevent bad surprises. Body shells are often sold with a protective sheet. Remove this sheet and lay it gently spread with the sticky side up in an adjoining room to prevent contamination. We‘ll need it later. Recently, the body shells come with a semi-transparent protective film on the outside. This film does not need be removed.

Let‘s start

Cutting the body shell
This paragraph applies to those who want to drive their car; therefore the engine needs some air. The windows and other required holes must be cut out! Special scissors for polycarbonate are the safest tool for this job.

Round holes
Round holes are pre-drilled to a small diameter and then expanded to the desired diameter with a reamer or a step drill by hand. This has the advantage that has larger holes will be actually round instead of triangular.

Bild 1
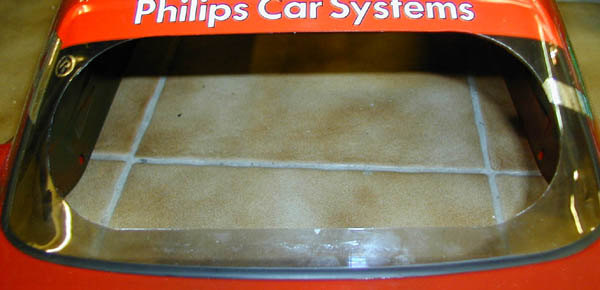
Bild 2

The windows ...
Here's how it‘s done quickest and smoothest: Take the scalpel and carve with reasonable pressure (not just scratching!) carefully along the contour where the windows are to be removed. It should be carved from the outside! This contour can have any layout you want, for example the complete window removed, a round hole or a turned down window.
Take care that you create smooth rounded layouts only, no sharp corners. Sharp corners will start cracks in case of a collision. The same applies to the rear window.
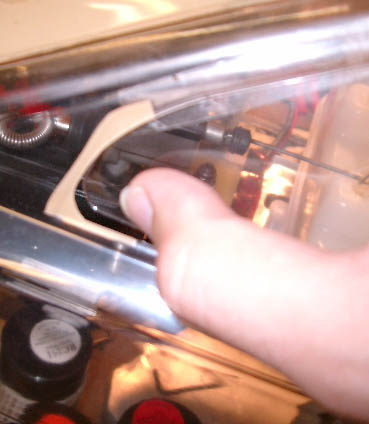
The cut-out should be as large as possible, but go for large radii in the corners. Helpful for the large opening is a circle with metal tip or a circle cutter. This helps for marking perfect large radii. (Picture 1)
After the contours are carved bend the plastic along those lines. After a few attempts the material will break along the line. Starting from this point the windowpane can be squeezed out towards the inside. (Picture 2)
If, however, the carving wasn‘t deep enough, or one has slipped with the knife, it can happen that the material tears uncontrollably. So, even if it sounds nice and easy, you should work very carefully.
Now, if all panes have been removed as required, the sharp edges of the cuts should be deburred with abrasive fleece to prevent injuries in the future!

Bild 3
Sanding the body shell
Next the body shell should be roughened slightly on the inside! Clear body shells are always painted from the inside.
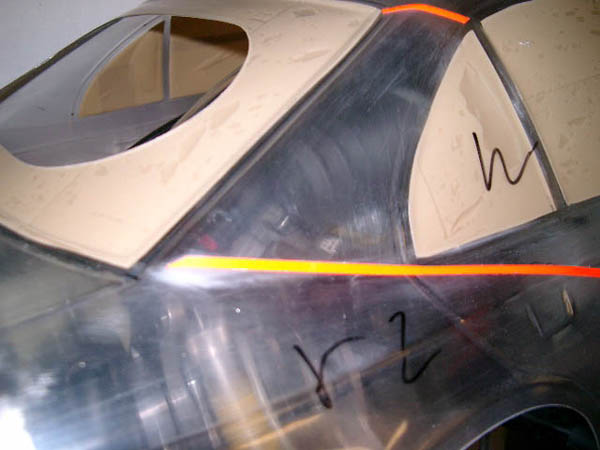
Buff the inside of the body shell using abrasive fleece. Take care to stay away from the windows, unless you want to paint them as well (looks odd!). The abrasive fleece will leave superfine scratches, but since the paint will be applied from the inside, these are later completely invisible. Some people use sandpaper for roughing. However, this is not as useful because sandpaper leaves much deeper traces. If you want sharp color edges make sure that you have no deep scratches. Otherwise it may happen that the paint creeps under the masking tape into the scratches and the lines are ruined. This is usually no problem with abrasive fleece, but better be safe than sorry. (Picture 3)
Once the body shell is completely prepared, the remaining of the abrasive fleece must be removed. This is best done with a compressor or acompressed air spray can.

Cleaning the body shell
The moulds used in the manufacturing process of the body shells are usually treated with silicone release agent for better removal of the finished shape. This causes a thin film on the surface of the shell, which badly affects the adhesion of the paint.
You need:

  • Mild detergent
  • paper towel or lint-free cloth
Depending on the body shell dimensions you should visit the bathroom, where you can clean it without feeling guilty. The body shell will now be washed with detergent. Do this very thoroughly, from the inside and out, and preferably do it twice, so there‘s really any dirt removed. Don‘t use b cleaners like alcohol or other solvents! All these chemicals remove the plasticizer and make the polycarbonate brittle and fragile. In a worst case you‘ll immediately get a milky body shell or spider web like cracks. After washing, every last drop of water is dried off with the cloth. Best dab only and do not wipe, so that the plastic can not be electrostatically charged. Of course, it is difficult to take a break now, but really worth it. Just to clarify, from now on you will touch the body shell with your fingers from the outside only! Leave the body shell some time to dry completely and to relieve even existing electrostatic charges. Please note that larger water droplets may leave calcium stains.

Bild 4

Masking the windows
Now it‘s time for the windows. They are supposed to remain transparent.
This time we will need:

  • masking tape
  • Sharp cutter knife or a scalpe

The windowpanes, where they are not already cut out, must be completely covered with masking tape. And this should be done as clean as possible, without wrinkles etc.
In the inner section of the masked area wrinkles are OK, just at the edge regions, respectively, the cut edges of the windowpanes must be smooth, because these are the sections where the paint will try to undermine the masking tape. Is everything is generously covered, cut the tape along the window frame with a knife (and only the masking tape, not the body shell) and remove the excess tape. The result should be a clean edge. (Picture 4)
For specific contours and stripes a special edge tape is recommended.

Now the paths separate for monochrome and in multi-colored designs.

Bild 5
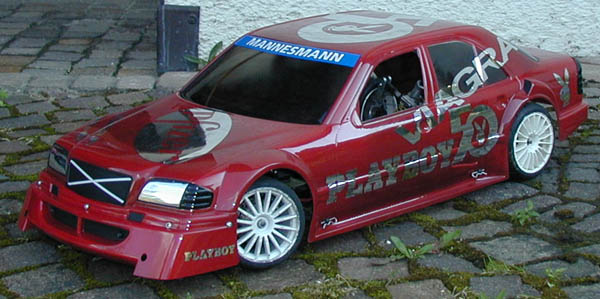
Monochrome designs (Picture 5)

In this variant, only the outer surface is protected from spray and then begin the painting.

Body shell preparation
Cut-out windows and mounting holes etc. are well-sealed from the outside with masking tape so that no spray will come through. The protective sheet will no be placed on the body shell again (where applicable). All areas not covered by the sheet are taped with masking tape, as well as the edges of the body (wheel arches, sills, etc.). The tape should extend about 1 cm above the edge, but should not bend or adhere to the inside. The milky transparent protective film does not need further treatment, except at points where the film is slightly peeled off. There is also a paint-on masking sheet" available. This is simply applied to the surface to be covered and removed after painting. But the liquid masking is not suitable for exact dividing lines, only for large areas (e.g. windows or interiors). After a final check of the edges of the windowpane masking, it can really start now.

Paint preparation
The paint needs preparation too.
In addition to the desired colors you should have:

  • A hairdryer or a pot of heated water. Use either of them to warm the can(s) to a temperature of 40-45 ° C prior use. This is an advice for the perfectionists. Normal room temperature actually works without problems.
For the following steps you should bring sufficient time since they should not be interrupted for extended periods. Before the actual painting process can take place, shake the can thoroughly for about 1 minute and warm it up to 45° C as mentioned above, using a hairdryer or water. This increases the pressure in the can, leading to a smoother and more economical paint application.

Applying the paint
Maintain a distance of about 30 cm between can (e.g. RC-Paint lexan paint) and body shell. A closer distance may cause the paint to run. The first coat should only be a very light but uniform. Allow to dry for about 5 minutes only and then apply additional light coats in a cross pattern. After each coat you should wait for about 3 minutes and then apply the next coat. The previous coat must not shine wet, that‘s a sign for there‘s too much paint applied at once. The paint should also not be dried thoroughly.
For large areas such as hood, roof, etc. it must be ensured that do not apply too much paint at the turning points where you change the movement of the spray. Otherwise you could see color differences from the outside. Such irregularities can be detected easily by holding the body against the light; insufficiently painted sections become visible and should be rectified.
After the actual color has applied, it should be backed up with a coat of RC 0710 white paint. This supports the luminosity of the colors, this is especially true in the colors of fluorescent lexan paint RC-1005, 1006, 1007, 1008, 1009, 1010, 1011, 1012, 1013 and 1014. It also prevents the shine through in light colors when you use RC 0419 window tint paint.
When the paint application is finished and everything is in order, the window masking should be removed 5-10 minutes later. This must be done very carefully, because the paint is still not already thoroughly dried. So, do not touch paint! If the windows shall remain entirely clear the outside coverage can also be removed. This must be done carefully as well, because otherwise parts of the masking tape might find their way into the freshly painted section. If you prefer to tint (RC 0419) the windows just leave the outside coverage in place.

Window tinting
The RC 0419 window tint should be applied at the earliest after about half an hour, otherwise the lower paint coats may be dissolved again. Light colors should be masked because otherwise the tint may show through.
For window tinting apply only very light coats, otherwise the tint will quickly become patchy. One must also be careful to not apply too many coats or you‘ll end up with black windows. Check from time to time, as in most cases 3-4 coats will be enough. Now the all masking and coverage can be removed. Carefully, of course, because the color is still not yet completely dry. When the paint job is finished let the paint dry for at least 6 hours, 24 hours are even better. Otherwise, the paint could be scratched easily.

Bild 6
Bild 4

Multi-colored designs (Picture 6)
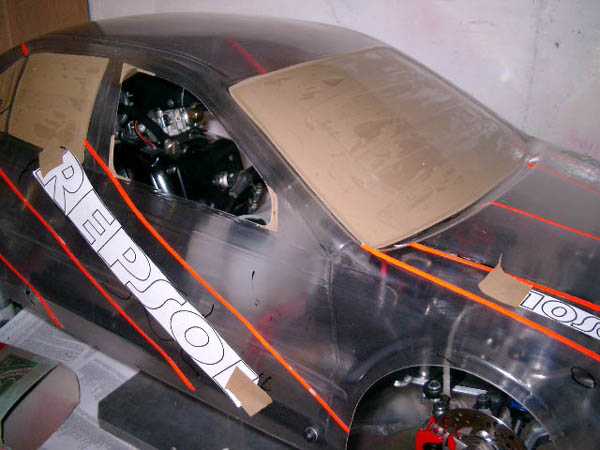
If you want to go for a multi-colored paint job you must watch for a few more details to make it come out like you really want. Basically, the following rule applies when painting multiple color polycarbonate body shells: start with the darkest paint and finish with the lightest one, otherwise the dark color shines through and hampers the appearance. It is important to note that gradients are almost impossible to achieve with spray cans. This is due to the fact that the spray cone of a can is not exactly confined. The unwanted overspray will contaminate the entire body shell and will always be visible afterwards. Any attempts to remove overspray basically fail because you‘ll never remove everything; or if you do you‘ll end up with a sharp edge instead of a nice gradient. Sharp color edges don‘t have this problem, because you only need to mask the area which shall not be painted. As the design has been thought out before, you can draw the contours of the color edges on the outside using a removable felt tip marker. (Picture 4)
If despite all precautions, an accident has happened, a paint killer will help. However, as good polycarbonate paint tends to dye the plastic to some degree, a 100% removal is almost impossible.

Masking the color edges
Apply the masking tape to the edges with a little overhang. Again, this should be done without any wrinkles. At corners, edges or trim lines make sure that the tape really everywhere adheres to the body shell and does not protrude from the surface. Otherwise, the paint will creep under it.
Now, simply hold the body shell against the light and see the previously applied markings shine through. Along these lines carefully cut the masking tape with a sharp blade and then remove that side of the masking tape that will be painted with the darkest color. Virtually everything else must be masked or the fine paint mist will find a way penetrate through every remaining crack. Potential fingerprints must be removed with some isopropyl or cleaner's naphtha. Cut out windows, mounting holes a.s.o. must be sealed with masking tape from the outside, so that no spray will come through.
The protective sheet will no be placed on the body shell again (where applicable). All areas not covered by the sheet are taped with masking tape, as well as the edges of the body (wheel arches, sills, etc.). The tape should extend about 1 cm above the edge, but should not bend or adhere to the inside. The milky transparent protective film does not need further treatment, except at points where the film is slightly peeled off. After a final check of the edges of the windowpane masking, it can really start now.

Paint preparation
The paint needs preparation too:
In addition to the desired colors you should have.

  • A hairdryer or a pot of heated water. Use either of them to warm the can(s) to a temperature of 40-45 ° C prior use. This is an advice for the perfectionists. Normal room temperature actually works without problems.
For the following steps you should bring sufficient time since they should not be interrupted for extended periods. Before the actual painting process can take place, shake the can thoroughly for about 1 minute and warm it up to 45 ° C as mentioned above, using a hairdryer or water. This increases the pressure in the can, leading to a smoother and more economical paint application.

Applying the paint
Maintain a distance of about 30 cm between can and body shell. A closer distance may cause the paint to run. The first coat should only be a very light but uniform. Allow to dry for about 5 minutes only and then apply additional light coats in a cross pattern. After each coat you should wait for about 3 minutes and then apply the next coat. The previous coat must not shine wet, that‘s a sign for there‘s too much paint applied at once. The paint should also not be dried thoroughly.
For large areas such as hood, roof, etc. it must be ensured that do not apply too much paint at the turning points where you change the movement of the spray. Otherwise you could see color differences from the outside. Such irregularities can be detected easily by holding the body against the light; insufficiently painted sections become visible and should be rectified.
When the paint application is finished and everything is ok the masking tape can be removed 5-15 min later. This must be done very carefully, because the paint is still not already thoroughly dried. So, do not touch paint! Now any small mistakes will be corrected by scraping small areas with a blade, wiping with an isopropyl or cleaner‘s naphtha cotton swab or removing with paint killer.
Now that the entire masking was removed, you can cautiously start with the masking for the next color. This procedure will be repeated for all remaining colors to be used. When all colors have been applied, they may be backed up with RC 0710 white. This improves the brilliance of the color. For metallic colors, backing with RC 0933 silver is recommended to enhance the desired metallic effect; fluorescent colors must have a RC 0710 white backing to get the "bright effect". It also prevents the shine through in light colors when you use window tint paint.
If the windows shall remain entirely clear the outside coverage can also be removed. This must be done carefully as well, because otherwise parts of the masking tape might find their way into the freshly painted section. If you prefer to tint (RC 0419) the windows just leave the outside coverage in place.

Hints on translucent polycarbonate colors
Translucent colors are tinted clear coats which are used to realize paint jobs with stunning looks, e.g. RC-Paint RC 0940 and 0941. When preparing the body shell surface it must be ensured that no deep scratches occur during sanding or masking, they would be definitely be visible in the paint later. It is important to make sure that the translucent paint is applied equally and evenly everywhere to avoid color differences.
The colors are applied in several thin coats until the desired thickness is reached. If these colors are used without a backing coat of a solid color, they remain transparent, but colored in the respective choice of color. This method is great for turn signals, taillights, window tint, or similar tasks.
This step of the painting should be laid entirely at the end of the paint job, as it is otherwise not possible to realize, or only with a lot of masking.
The different results you can achieve with these colors by using various other opaque colors for a backing coat are very diverse. They should only be made after painting a trial application on a piece of scrap polycarbonate to check whether the results please you. For example: with RC 0933 silver backing you‘ll get a pearl effect, RC 0710 white backing results in a “normal” color. In general, the thicker the translucent color layer, the more intense and darker the color achieved.

Window tinting
The RC 0419 window tint should be applied at the earliest after about half an hour, otherwise the lower paint coats may be dissolved again. Light colors should be masked because otherwise the tint may show through.
For window tinting apply only very light coats, otherwise the tint will quickly become patchy. One must also be careful to not apply too many coats or you‘ll end up with black windows. Check from time to time, as in most cases 3-4 coats will be enough. Now the all masking and coverage can be removed. Carefully, of course, because the color is still not yet completely dry. When the paint job is finished let the paint dry for at least 6 hours, 24 hours are even better. Otherwise, the paint could be scratched easily

We wish you a long and crash-free ride with your new body shell!

Fuel mixture

A high quality oil and premium gas (Super plus) should be used for the mixture. Fully synthetic two stroke oils from go-cart racing (eg Motul), where the engines run under similar conditions, have proven itself in practice.

With a mix ratio of 1:25 you are safe regarding lubrication and engine life.
With a ratio of 1: 50 for example there's only a minor increase in performance but the high risk of overheating the engine and seizing the piston.

Mixing ratio 1:25 (4.00% oil)

* 1 litre of gasoline - 40ml oil
* 5 litres gasoline - 200ml oil

Note: Fill the oil into the can first then add the gasoline!

Storage: fuel/oil mixtures should not be stored for longer than four weeks; after that time certain
components in the mixture start to decompose, thereby reducing lubrication and ignitability.
The consequences are high wear, higher engine temperature and less power!


German version taken from bigscaler.de

COMPETITION / EVO 07 / EVO 08 WORLDCHAMPION
Front axle Rear axle
Wheel camber: 0° -1,5° for pressed-down chassis 2-3° for pressed-down chassis
Trailing effect: 4-6mm clips
Toe-in: Slightly open 2,5° (3° for Truck)
Damper springs: Red progressive Item N°. 10193 Blue ton spring Item N°. 07284
Spring camber: 3mm (4mm for Truck) 1mm (5mm for Truck)
Damper position: Lower wishbone outer boring, upside medium position Rear lower damper mount 2nd boring, upside flat position
Damper piston: 5-hole Aluminium Item N°. 07084 5-hole Aluminium Item N°. 07084
Damper oil: 6000-7000 FG damper oil 4000 FG damper oil
Stabilizer: 5mm/ 3/4 strong adjustment 4mm medium adjustment
Driving height: 52mm (53mm for Truck) top edge front axle thread measured without wheels, chassis lying on planar plate 45mm (54mm for Truck) top edge front axle thread measured without wheels, chassis lying on planar plate
Position upper wishbone: Mostly upper boring Mostly upper boring
Servo-Saver: 3rd hole, outer hole position
Brakes: Steel brake lining Item N°. 09439/36
GRP brake disks Item N°. 09445/06
For Truck:
Brake lining Item N°. 09439/06
Steel brake disks Item N°. 09445
Steel brake lining Item N°. 09439/36
GRP brake disks Item N°. 09445/06
For Truck:
Brake lining Item N°. 09439/06
Steel brake disks Item N°. 09445
Differential gear: Quad. alloy diff. self-locking Item N°. 08501/05
or viscous locking differential Item N°. 08603

he heat range

The heat range of a spark plug is a subject by itself, where the single words are easily mistaken. The selection of a plug with a matching heat range must always be seen as a matching to the actual thermal conditions that occur during continuous operation. The different properties of the engines with respect to load, work principle, compression ratio, speed, cooling and fuel make it impossible to get along with a "one type fits all plug". Best spark plugs for our application in rc-cars are e.g.: Champion RZ7C or NGR CMR7A
The same spark plug which would heat up strongly in one engine would stay at a relatively low medium temperature in another one. In the first scenario the mixture would ignite uncontrolled at hot parts of the plug (surface ignition), the other case would be the insulator quickly fouled so much that misfiring occurs.

Below about 500 degrees Celsius carbonaceous combustion residues will deposit onto the insulator and create a shunt. The ignition voltage then takes the easiest way via this layer of soot and will be grounded to the spark plug thread without generating a spark.

Because these residues are easily burned at high temperatures the plug should reach a temperature above 500 degrees Celsius as soon as.
By different designs with corresponding heat ranges, the manufacturers try to keep the temperature at the insulator nose always within the range of 500 to 850 degrees Celsius. The range from 850 to about 1000 degrees is a safety area where there is still no surface ignition; electrode wear however will increase rapidly. Only when the temperature rises even higher the dreaded surface ignition will start.
A relatively "hot" pug takes up a lot of heat by design, and derives little heat to the cylinder head. So it quickly reaches the self-cleaning temperature in an engine that operates at a moderate heat level, a "tame" low power engine.
A so-called "cold" plug takes up very little heat and even directs much of it straight to the cylinder head. This makes it suitable for highly modified engines that tend to run hot.


You should definitely always follow the engine manufacturer's recommendations for the spark plugs. Exceptions may be very high ambient temperatures or modified engines. When trying different heat ranges, always keep a look at the plug's face (described in next section) to read the spark plug conditions.
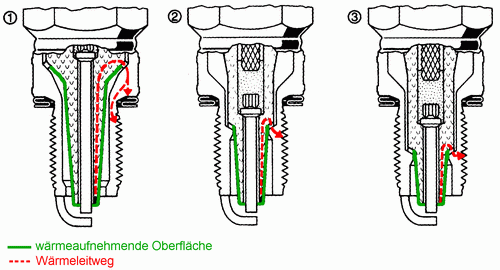
This picture shows the design of different heat ranges.


Fig.1 spark plug with high heat range ("hot plug"). Large insulator nose surface absorbs much heat. Low heat dissipation.

Fig.2 spark plug medium heat range. Insulator nose surface smaller than with "hot plug". Less heat absorption. Better heat dissipation.

Fig.3 spark plug low heat range ("cold spark"). Small insulator nose surface absorbs little heat. Heat dissipation is very good.
The spark plug appearance

Spark plug appearance provides information about the operating performance of the engine and spark plug. The appearance of electrodes and insulators of the spark plug is evidence of the operating performance of the spark plug and to the mixture composition and the combustion process of the engine.
Judging spark plug condition is an essential part of engine diagnosis. A reliable statement, however, is subject to the following important condition: Before the spark plug faces are evaluated, the car must have been driven. A previous prolonged idling, particularly when the engine is started cold, can cause soot and cause false reading of the spark plug appearance. The car should be run over a distance of about five laps. This engine should be operated with varying speeds. A longer idling before turning off the engine must be avoided.
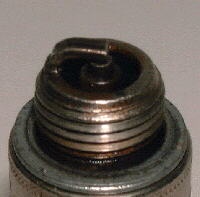
These pictures show the different spark plug appearances.


Fig. 1: Blackened or oily: insulator, electrode and plug body are covered with a velvety-black, oily coating. Spark plug did not reach the necessary self-cleaning temperature (500 to 850 ° C). Reason: Gas mixture (carb setting) too rich, dirty air filter or wrong heat range. Results: shunt firing, poor cold start characteristics. Remedy: Adjust mixture leaner, clean air filter, if necessary, clean or replace spark plugs.

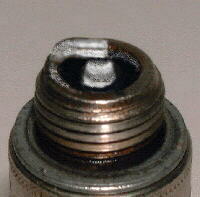
Fig. 2: Light grey electrode. Cause: Thermal overload (for example by sucking in false air), spark plug of incorrect heat range or lean mixture. Results: misfiring, power loss, engine failure. Remedy: adjust mixture more towards rich side; where appropriate install new plug with the correct heat range.

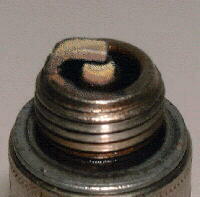
Fig. 3: Normal: insulator nose with brown to greyish tan color. The ideal case, i.e. the engine, ignition and heat range of the plug are completely in order. The slight crust on the ground electrode is meaningless.
Spark plug installation

When installing the spark plug into the engine, note the following: The contact surface on the spark plug seat and engine must be clean. Today's spark plugs do not need graphite or graphite lubricant on the thread. They are treated with an anti-seize lubricant. A seizure is not possible since the threads are nickel plated.

When tightening the spark plug the hex transfers the torque to sealing seat and thread. If by excessive torque or tilting the spark plug wrench the spark plug housing is tweaked, the insulator may come loose. Therefore, the torque may not exceed the value specified for plug and engine.
It is therefore appropriate to go with the following rules of thumb: insert spark plug into the cleaned thread and hand tighten until the gasket meets the cylinder head, and then put on the spark plug wrench.
Tighten new spark plug after the first rotation inhibition by a quarter turn. Already used spark plugs should only be tightened to the equivalent of about 5 minutes on a clock or an angle of about 30°.

When tightening or removing the spark plug the socket wrench must be held straight, otherwise the insulator is usually pushed away or pushed aside, and the spark plug becomes useless.
Over-tightening a spark plug may damage the thread in the cylinder head, a problem especially with aluminum heads; when the plug is not tightened enough heat conductances may be inadequate.

How to start a largescale car engines from 23 to 30 cc:

1. Fill the fuel tank with gas

2. Close the choke!

If you're uncertain you may remove the air filter in order to check whether the choke flap is actually closed!

3. Press the primer pump on the carb a few times until you can see some fuel drops in the ball.

Caution: do not pump until the ball is completely filled!

4. Switch the transmitter on

5. Switch the receiver on

6. Start the engine

Note: once an ignition is recognizable or heard, stop pulling the starter immediately or the engine will become flooded!

7. So when the engine starts to ignite, open the choke now.

8. At this status the engine should come to life at the latest after 5 to 6 pulls on the starter.

Caution: Do not pull for minutes on end – this is useless!

If the engine fails to start:

9. Remove spark plug and check: the tip should be free from significant dark or black deposits. Clean with sandpaper or brush if necessary!

10. Put the car into a position with the open spark plug hole pointing downwards.
Pull the starter a few times to remove accumulated fuel through the spark plug hole...

...and then start again with item 2!

However, to be sure that the spark plug is in working order, it is best to use a new spark plug if available.

Once the engine is running: we wish you a lot of fun with your car!

Your rc-car-online team

Here we present a photo gallery, which should help you with installation of FG servo saver #1212 in combination with carbon fiber radio plate FG #1213.


Befüllanleitung Mecatech Expert Hydraulikbremse
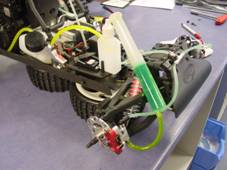
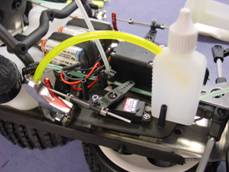
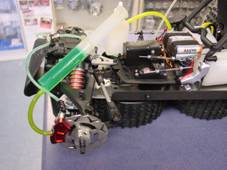
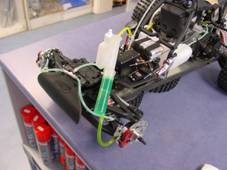
Bleeding the Mecatech Expert hydraulic brake

Entlüftungsventile am Hauptbremszylinder und Radbremszylindern immer etwa 1 Umdrehung öffnen wenn die Befüllspritze und der Auffangbehälter angeschlossen sind, ansonsten vor dem abnehmen dieser die Ventile immer wieder direkt verschließen!

Press the brake fluid with the syringe from one slave brake cylinders towards the master brake cylinder until there are no more bubbles in the tube to the overflow bottle.

Mit einer Spritze Bremsflüssigkeit von den Radbremszylindern zum Hauptbremszylinder drücken, bis keine Luftblasen mehr aus dem Hauptbremszylinder in den Schlauch am Auffangbehälter aufsteigen.

Bleeder valves on master and slave brake cylinder should be opened 1 full turn when connected to the syringe and the overflow bottle. Re-close the valves immediately before you remove the tubes.

Nach verschließen der Entlüftungsventile mehrmals mit dem Bremshebel die Bremse von Hand betätigen und auf etwaige Luftblasen in den Bremsleitungen achten.
Sollten sich Luftblasen in den Bremsleitungen befinden den Entlüftungsvorgang solange wiederholen bis keine Luftblasen mehr in den Bremsleitungen sind.

After closing the bleeder valves activate the brake manually several times and check for bubbles in the brake lines.
If you get some bubbles, repeat the procedure until the lines are free of bubbles.

Preparation and optimal settings


Instructions for creating the setup of 1/5 FG touring cars


Before the model is adjusted and measured, it should be ensured that all rotating parts turn easily (ball bearings, ball joints, drive shafts, servo saver ...)


Before setup changes are made, the wheels must be removed and underside of the chassis as well as the surface of the setup plate have to clean.


For drawing up a basic setup the stabilizer bar must be unhooked on one side (disengaging the ball from the sleeve). The same goes for the shock absorbers; or even better: remove them completely.


 Then the adjustement of the rear suspension starts:


1) Setting toe in (with aluminum dial-in wheels)

2) Camber adjustment (aluminum dial-in wheels)

3) Suspension droop (chassis is flat on the board), measure the outer threaded section downwards with calipers

4) Adjust stabilizer bar stiffness only Evo
5) Adjust stabilizer play only Evo

6) Re-install shock absorbers


1-3° toe in

-2.5° camber

Droop 46 mm

Green Feldmann cask springs y0488

Shock oil
4000
 and Sportsline 6000Stabilizer bar 50%, Sportsline 4mm Stabilizer

Shock tower top (# 1075) central hole (out of 5) only Evo

Triangle bottom second hole from the top (# 1072/04) only Evo

Upright extension put 1 conical spacer + 1 washer underneath only Evo

Wheelbase - knuckle medium

A-arm
backed down evenly with 1 conical spacer
Upper a-arm upper hole in differential bearing carrier only Evo

Open diff (2-fold, 4-fold or Powerlock)

Ride height 8 mm


 The same steps have to be performed at the front suspension.

 However, make sure that the wheels are aligned perfectly straight (servo saver)!


Droop 51mm measured at the thread of the axle shaft

Blue Feldmann spring y0501

Shock oil 7000 and Sportsline 9000

1° camber (positive)

Stabilizer bar 90% hard

Upper shock tower center hole

Lower triangle bottom hole

Axial knuckle flipped (2 holes facing down), bottom side with 2 conical spacers, 1 conical spacer on top
Ride only Evo
height 7 mm 
Toe out 5-8 mm open

Caster 2 mm behind upper a-arm


 At the end of the settings install the actual wheels for driving and adjust ride height. (Droop gauge recommended)


Tire recommendation parking lot: PMT Supreme, rear H05 oder X3, front H10 or H07 or used X3 or H05

Tire recommendation track: PMT Supreme, rear X3 or X5, front H10 or used X3 or H05

Influence of diff fluid viscosity on handling

Front Thinner
increases steering into corners (off-power) if oil is too thin the steering may become inconsistent, especially it can lose forward traction (and steering) during acceleration out of corners Thicker: increases stability into corners during braking increases steering on-power at corner exit

Center Thinner:
front wheels unload more during acceleration decreases on-power steering (reduces oversteer) easier to drive on rough tracks if a high-power engine is used you could waste too much power and sometime “cook” the oil in the center diff erential because it “overloads” Thicker: more all-wheel drive effect better acceleration increases on-power steering (reduces understeer) better suited on high-bite, smooth tracks car can be more nervous to drive especially if a high power engine is used - you might need to be smooth on the throttle

Rear Thinner:
increases cornering traction increases steering into corner Thicker: decreases rear traction while cornering reduces wheelspin
• Artikel aus der Zeitung Automodell + Technik amt im Mai 2013


Set-up tips for Power Lock differential # 8605.

  • You have the possibility of changing the locking effect using different ramp angles ( Pos 1 – low track grip level up to Pos 3 – high track grip level)
  • With different size of shim diameters, you can make further precise adjustments of the locking effect (see new differential shim set for the Powerlock Differential).
  • The initial filling should be with 10ml of oil. After changing the setting of the locking effect it is enough to put 7-8ml oil back into.
  • The oil quantity has also an influence on the locking effect, the more oil you put into, the less locking effect/friction you will get (softer launch of locking effect), never put more than 20ml oil into the differential.
  • Before opening the housing, loosen the preload screw completely, in order that the reassembly is easier to complete.
  • After assembly use a rubber mallet and hit slightly on both half-shafts to settle all parts in the housing.


Most important adjustment of the differential: The preload screw must always be tighten up smoothly, so that the preload mechanism is touching slightly the package (little preload on the system). After some couples of laps, please check the preload screw and adjust it again if necessary. If the preload screw is not toughing slightly the package, it could be that the car is nervous on acceleration.

Umbauliste für FG Monster/Stadium Modelle

Diese Liste gibt an, welche FG Teile für einen Umbau benötigt werden, ausgehend vom im entsprechenden Tabellenkopf genannten Ausgangsfahrzeug.

Conversion list for FG monster/stadium cars

This table shows the necessary FG part numbers for the conversion, based on the current vehicle listed on top of the corresponding table.


Monster Truck
Monster Jeep
  • 2 x 7155
  • 1 x 40150
  • 1 x 40155
Monster Beetle Pro
  • 2 x 7155
  • 1 x 6175
  • 1 x 6176
  • 1 x 6202/1
  • 1 x 6421/5
Monster Hummer
  • 2 x 7154/1
  • 1 x 6175
  • 1 x 6176
  • 2 x 7155
  • 2 x 6033/1
  • 1 x 30150
  • 1 x 30155
Stadium Truck
  • 2 x 7155
  • 2 x 7011/1
  • 1 x 6432
  • 1 x 6427
  • 2 x 6104
  • 1 x 6107
  • 2 x 6230/06
  • 1 x 21150/11
  • 1 x 20155
  • 1 x 7331/5
Stadium Beetle Pro
  • 2 x 7155
  • 1 x 6175
  • 1 x 6176
  • 1 x 6202/1
  • 1 x 6421/5
  • 1 x 6432
  • 1 x 6427
  • 2 x 6104
  • 1 x 6107
  • 2 x 6230/06
Stadium Jeep
  • 2 x 7154/1
  • 1 x 6175
  • 1 x 6176
  • 1 x 6432
  • 1 x 6427
  • 2 x 6104
  • 1 x 6107
  • 1 x 41150
  • 1 x 40155
  • 2 x 6230/06
  • 2 x 6033/1
Stadium Hummer
  • 2 x 7154/1
  • 1 x 6175
  • 1 x 6176
  • 2 x 7155
  • 2 x 6033/1
  • 1 x 30150
  • 1 x 30155
  • 2 x 6104
  • 1 x 6107
  • 1 x 6432
  • 1 x 6427
  • 1 x 6432
  • 1 x 6427
Monster Hummer
Monster Truck
  • 1 x 6185
  • 2 x 6033
  • 1 x 20150/11
  • 1 x 20155
Monster Beetle Pro
  • 1 x 6185
  • 2 x 6033
  • 1 x 6202/1
  • 1 x 6421/5
Monster Jeep
  • 2 x 6033
  • 1 x 40150
  • 1 x 40155
Stadium Truck
  • 1 x 6185
  • 1 x 7011/1
  • 1 x 7331/5
  • 1 x 6432
  • 1 x 6427
  • 2 x 6104
  • 1 x 6107
  • 2 x 6230/6
  • 1 x 20155
  • 1 x 21150/11
  • 2 x 6033/2
Stadium Hummer
  • 1 x 6432
  • 1 x 6427
  • 2 x 6104
  • 1 x 6107
  • 2 x 6230/6
Stadium Jeep
  • 1 x 6185
  • 1 x 6432
  • 1 x 6427
  • 2 x 6104
  • 1 x 6107
  • 2 x 6230/6
  • 1 x 41150
  • 1 x 40155
Stadium Beetle Pro
  • 1 x 6185
  • 2 x 6033
  • 1 x 6432
  • 1 x 6427
  • 1 x 6107
  • 2 x 6104
  • 2 x 6230/6
  • 1 x 6202/1
  • 6421/5
Monster Beetle Pro
MonsterTruck
  • 1 x 20150/11
  • 1 x 20155
  • 1 x 7331/4
Monster Jeep
  • 1 x 40150
  • 1 x 40155
  • 1 x 7331/4
  • 2 x 7155
Monster Hummer
  • 2 x 6033/1
  • 2 x 7154/1
  • 1 x 733174
  • 1 x 30150
  • 1 x 30155
Stadium Truck
  • 1 x 7011/1
  • 1 x 6432
  • 1 x 6427
  • 2 x 6104
  • 1 x 6107
  • 1 x 21150/11
  • 1 x 20155
  • 2 x 6230/6
Stadium Hummer
  • 2 x 7154/1
  • 2 x 6033/1
  • 1 x 6432
  • 1 x 6427
  • 2 x 6104
  • 1 x 6107
  • 1 x 7331/4
  • 1 x 30150
  • 1 x 30155
  • 2 x 6230/6
Stadium Jeep
  • 2 x 7154/1
  • 2 x 6033/1
  • 1 x 6432
  • 1 x 6427
  • 2 x 6104
  • 1 x 6107
  • 1 x 7331/4
  • 2 x 6230/6
  • 1 x 41150
  • 1 x 40155
Stadium Beetle Pro
  • 1 x 6432
  • 1 x 6427
  • 1 x 6107
  • 2 x 6104
  • 2 x 6230/6
Monster Jeep
MonsterTruck
  • 1 x 6185
  • 1 x 20150/1
  • 1 x 20155
Monster Beetle Pro
  • 1 x 6185
  • 1 x 6202/1
  • 1 x 6421/5
  • 1 x 6175
  • 1 x 6176
Monster Hummer
  • 2 x 715471
  • 2 x 6033/1
  • 1 x 6175
  • 1 x 6176
  • 1 x 30150
  • 1 x 30155
Stadium Truck
  • 1 x 6185
  • 1 x 7011/1
  • 1 x 7331/5
  • 1 x 6432
  • 1 x 6427
  • 1 x 6107
  • 2 x 6104
  • 2 x 6230/6
  • 1 x 21150/11
  • 1 x 20155
Stadium Hummer
  • 2 x 7154/1
  • 2 x 6033/1
  • 1 x 6175
  • 1 x 6176
  • 1 x 6432
  • 1 x 6427
  • 1 x 6107
  • 2 x 6104
  • 2 x 6230/6
  • 1 x 30150
  • 1 x 30155
Stadium Jeep
  • 1 x 7154/1
  • 2 x 6033/1
  • 1 x 6175
  • 1 x 6176
  • 1 x 6432
  • 1 x 6427
  • 1 x 6107
  • 2 x 6104
  • 2 x 6230/6
  • 1 x 41150
  • 1 x 40155
Stadium Beetle Pro
  • 1 x 6185
  • 1 x 6175
  • 1 x 6176
  • 1 x 6432
  • 1 x 6427
  • 1 x 6107
  • 2 x 6104
  • 2 x 6230/6
  • 1 x 6202/1
  • 1 x 6421/5
Stadium Truck
Stadium Hummer
  • 2 x 7154/1
  • 2 x 7154
  • 1 x 6175
  • 1 x 6176
  • 2 x 6033/1
  • 1 x 7331/4
  • 1 x 30150
  • 1 x 30155
Stadium Jeep
  • 2 x 7154/1
  • 2 x 6033/1
  • 1 x 6175
  • 1 x 6176
  • 1 x 7331/4
  • 1 x 41150
  • 1 x 40155
Stadium Beetle Pro
  • 2 x 7154
  • 1 x 6175
  • 1 x 6176
  • 1 x 6202/1
  • 1 x 6421/5
Monster Truck
  • 2 x 7154
  • 1 x 7331/4
  • 1 x 6107/1
  • 2 x 8466
  • 1 x 20150/11
  • 1 x 20155
  • 1 x 6431/1
  • 1 x 6052
  • 2 x 6228/6
Monster Beetle Pro
  • 2 x 7154/2
  • 1 x 6175
  • 1 x 6176
  • 1 x 6431/1
  • 1 x 6052
  • 2 x 6228/6
  • 1 x 6107/1
  • 2 x 8466
  • 1 x 6202/1
  • 1 x 6421/5
Monster Jeep
  • 2 x 7154
  • 1 x 7331/4
  • 1 x 6107/1
  • 2 x 8466
  • 2 x 6228/6
  • 1 x 6431/1
  • 1 x 6052
  • 1 x 40150
  • 1 x 40155
Monster Hummer
  • 2 x 7154/1
  • 1 x 7331/4
  • 1 x 6107/1
  • 2 x 8466
  • 1 x 6431/1
  • 1 x 6052
  • 2 x 6033/1
  • 2 x 7154
  • 1 x 6175
  • 1 x 6176
  • 2 x 6228/6
  • 1 x 30150
  • 1 x 30155
Stadium Hummer
Stadium Truck
  • 1x 6185
  • 2 x 6033
  • 1 x 7011/1
  • 1 x 7331/5
  • 1 x 21150/11
  • 1 x 20155
Stadium Jeep
  • 1 x 6185
  • 1 x 41150
  • 1 x 40155
Stadium Beetle Pro
  • 1 x 6185
  • 2 x 6033
  • 1 x 6202/1
  • 1 x 6421/5
Monster Truck
  • 1 x 6185
  • 2 x 6033
  • 1 x 6431/1
  • 1 x 6052
  • 1 x 6107/1
  • 2 x 8466
  • 2 x 6228/6
  • 1 x 20150/11
  • 1 x 20155
Monster Beetle Pro
  • 1 x 6185
  • 2 x 6033
  • 1 x 6202/1
  • 1 x 6421/5
  • 1 x 643171
  • 1 x 6052
  • 1 x 6107/1
  • 2 x 8466
  • 2 x 6228/6
Monster Jeep
  • 2 x 6033
  • 1 x 6431/1
  • 1 x 6052
  • 1 x 6107/1
  • 2 x 8466
  • 2 x 6228/6
  • 1 x 40150
  • 1 x 40155
Monster Hummer
  • 1 x 643171
  • 1 x 6052
  • 1 x 6107/1
  • 2 x 8466
  • 2 x 6228/6
Stadium Beetle Pro
Stadium Truck
  • 1 x 7011/1
  • 1 x 7331/5
  • 1 x 21150/11
  • 1 x 20155
Stadium Hummer
  • 2 x 7154/1
  • 2 x 6033/1
  • 1 x 7331/4
  • 1 x 30150
  • 1 x 30155
Stadium Jeep
  • 2 x 7154/1
  • 2 x 6033/1
  • 1 x 7331/4
  • 1 x 41150
  • 1 x 40155
Monster Truck
  • 1 x 6052
  • 1 x 6431/1
  • 1 x 7331/4
  • 1 x 6107/1
  • 2 x 8466
  • 2 x 6228/6
  • 1 x 20150/11
  • 1 x 20155
MonsterBeetle Pro
  • 1 x 6052
  • 1 x 6431/1
  • 1 x 6107/1
  • 2 x 8466
  • 2 x 6228/6
Monster Jeep
  • 1 x 6052
  • 1 x 6431/1
  • 1 x 6107/1
  • 2 x 8466
  • 2 x 6228/6
  • 1 x 7331/4
  • 1 x 40150
  • 1 x 40155
Monster Hummer
  • 2 x 7154/1
  • 2 x 603371
  • 1 x 7331/4
  • 1 x 30150
  • 1 x 30155
  • 1 x 6052
  • 1 x 6431/1
  • 1 x 6107/1
  • 2 x 8466
  • 2 x 6228/6
Stadium Jeep
Stadium Truck
  • 2 x 7155
  • 2 x 6033
  • 1 x 7011/1
  • 1 x 7331/5
  • 1 x 21150/11
  • 1 x 20155
Stadium Hummer
  • 2 x 7155
  • 2 x 7154
  • 1 x 30150
  • 1 x 30155
Stadium Beetle Pro
  • 2 x 7155
  • 2 x 7154
  • 2 x 6033
  • 1 x 6202/1
  • 1 x 6421/5
Monster Truck
  • 2 x 7154
  • 2 x 6033
  • 1 x 6431/1
  • 1 x 6052
  • 1 x 6107/1
  • 2 x 8466/2
  • 2 x 6228/6
  • 1 x 20150/11
  • 1 x 20155
Monster Beetle Pro
  • 2 x 7155
  • 2 x 7154
  • 2 x 6033
  • 1 x 6202/1
  • 1 x 6421/5
  • 1 x 6052
  • 1 x 6431/1
  • 1 x 6107/1
  • 2 x 8466
  • 2 x 6228/6
Monster Jeep
  • 2 x 7154
  • 2 x 7155
  • 2 x 6033
  • 1 x 6052
  • 1 x 6431/1
  • 1 x 6107/1
  • 2 x 8466
  • 2 x 6228/6
  • 1 x 40150
  • 1 x 40155
Monster Hummer
  • 2 x 7155
  • 2 x 7154
  • 1 x 6052
  • 1 x 6431/1
  • 1 x 6107/1
  • 2 x 8466
  • 2 x 6228/6
  • 1 x 30150
  • 1 x 30155

Parts comparison FG Marder/Baja and Smartech Uno, Monster Truck, Pick Up Truck, Gas Blaster, Beetle and Carson Attack, Attack Evo

FG Art.# description compatible optically identical optically different notes
8348 fuel tank complete with vent lines X   X identically with touring car tank
6134/1 engine mount small Zenoah     X  
6135 engine mount large Zenoah     X  
6031 roll bar X   X  
6032 brace for roll bar X X    
6033 wing mount X   X  
6116 rc-plate Futaba X   X  
6540 rx-box X   X  
6028/1 steering rod r/l 74 mm   X   compatible with touring car 1/5
6030 steel ball l 10 x 10,75 X X    
6024 servo saver axle and washer X X    
6023 servo saver A/B X X    
6023 linkage M4 X   X  
6027/5 balljoint 6 mm X X    
6027/6 steel ball 6 mm X X    
6075 hinge pin, rear upper X X    
6072/1 a-arm, rear lower, adjustable X   X Please note: Monster-Truck, Pick Up Truck, Beetle, Attack Evo and Comanche have proprietary a-arms! Only genuine parts will fit!
6100/3 turnbuckle 32 mm X X   1 mm shorter
6431 steel pinion 16T X X    
6423 gear protector     X  
6427 plastic spur gear 46T   X   Smartech/Carson 48T
6428 plastic pinion 18T   X   Smartech/Carson 17-20T (Special version)
6050 spur gear carrier 60 mm X X    
6051 pucks X X    
6039 gear plate   X   different distance between bearings, can be used together with both FG engine mounts!
6137/1 spacer tubes for gear plate   X   1,5 mm longer
6049 clutch bell X X    
6041 layshaft X   X  
6042 brake pads and brake disk square X X   brake disk square 7 mm shorter
6044 brake disks X X   Smartech/Carson 2mm, FG 2,5 mm thickness
6045 brakeshaft with lever     X hole and angle of the lever are different
6481 alloy shock absorber, 2000, lang X   X identically with touring car shock 1/5
7089 shock piston X X  
7088 diaphragm X X  
7094 sleeve nut M16x1 X X  
7095 adjustment ring X X  
7087/2 shock mount, lower, long X X  
7092 spring seat X X  
7087 shock mount, upper   X   larger bore diameter (5mm)
6096 shock absorber mounting bolt X X    
6072/1 upright, rear X X   distance between bores for brake caliper smaller
6106 wheel square   X   wider, 11,5 mm
6079 rear axle shaft   X   3 mm longer
6080 dogbone   X   No FG shafts fit. Uno and Attack's length falls in between FG sizes, Monster-Truck, Pick Up Truck, Beetle, Evo and Comanche have longer shafts!
6082 gear protector X X    
6071 alloy rear axle brace     X  
6064 differential case X X    
6065 differential tube X X   anodized
6048 differential spur gear 48T X X    
6069/1 differential output shaft   X   different spline size, but compatible when installed as a complete set
6066/1 diff. bevel gear A      
6067 diff. bevel gear B      
6068 differential axle X X    
6061 diff. mount l/h X   X  
6062 diff. mount r/h X   X  
7070/1 rear plate 97 X   X  
6029/1 balljoint 10 mm X   X  
6081/1 steel ball 5/10x15 X X    
6076/1 a-arm turnbuckle 61mm X X    
7103/1 uprights front X   X identically with touring car 1/5
6010/1 alloy chassis Zenoah     X  
6105 rims X   X  
6108 tires X   X outer diameter and thread slightly different
6414 foam inserts X      
6099 shock stay front X X    
8092 shock mounting shaft X X    
6104 wheel axle front X X    
6011 rocker panels X   X  
8097 front bulkhead A X   X     Complete FG front axle is a direct replacement for the Smartech/Carson Uno and Attack.

Please note: Monster-Truck, Pick Up Truck, Beetle, Attack Evo and Comanche have proprietary a-arms! Only genuine parts will fit!

8098 front bulkhead B X   X
8100 a-arm, front lower X   X
8100/1 a-arm, front upper X   X
6099 shock stay front X X  
7102 hinge pin front X X  
7103/1 upright front X   X
6104 front wheel axle X X  
6029/1 balljoint 10 mm X   X
6106        
8140 alloy brace for front axle X X  
6081/1 steel ball 5/10x15 X X  
8092 shock mounting shaft X X  
Parts comparison FG Sportsline chassis 1/5 and
Carson on road chassis 1/5
FG Art.# description compatible optically identically optically different notes
8348 fuel tank complete with vent lines X X    
6028/1 steering rods r/l 74 mm   X    
6540 rx-box X   X  
6026 linkage M4 X   X Carson r/l threads
6027/5 balljoint 6mm X X    
6027/6 steel ball 6 mm X X    
6075 hinge pin, rear upper X X    
6072/1 a-arm, rear lower, adjustable X   X  
6100/3 turnbuckle 32mm X X   1mm shorter
6423 gear protector (7422) X X    
6051 pucks X X    
6137/1 spacer tubes for gear plate   X   1,5 mm shorter
6049 clutch bell X X    
6041 layshaft X   X  
6481 alloy shock absorber, 2000, lang X   X identically with touring car shock 1/5
7089 shock piston X X  
7088 diaphragm X X  
7094 sleeve nut M16x1 X X  
7095 adjustment ring X X  
7087/2 shock mount, lower, long X X  
7092 spring seat X X  
7087 shock mount, upper   X   larger bore diameter (5mm)
6096 shock absorber mounting bolt X X    
6077/1 upright, rear X X   distance between bores for brake caliper smaller
7050 spur gear carrier < 52 mm X X    
6044 brake disks X X   Carson FG 2,4 mm thickk
6023 servo saver A/B X X    
6027 balljoint 6mm with ball X   X  
6024 servo saver< axle and washer X X    
3014 body mounts MB Truck X X    
7010/1 allloy chassis Ecoline lang     X engine positioned differently
8420/1 plastic bumper with foam X X   Carson with hex
7152/1 body support X X    
7152/2 body support X X    
7153 spacer for body support X X   Carson 1mm
7105 ATS rim white X X    
5014 rc-plate X   X  
7068 rear axle riser plate X X    
8455 alloy caliper for disk brake X   X compatible as a complete unit
8462/6 plastic guide plate      
8393 brake bridge X X  
6079 rear axle shaft   X   3mm longer
6080 dogbone   X   4 mm shorter
6082 gear protector   X    
6071 alloy rear axle brace     X  
6064 differential case X X    
6065 differential tube X X   anodized
6048 differential spur gear 48T X X    
6069/1 differential output shaft   X   different spline size, but compatible when installed as a complete set
6066/1 diff. bevel gear < A      
6067 diff. bevel gear < B      
6068 differential axle X X    
6061 diff. mount l/h X   X  
6062 diff. mount r/h X   X  
7070/1 rear plate 97 X   X  
6029/1 balljoint 10 mm X   X  
6081/1 steel ball 5/10x15 X X    
6076/1 a-arm turnbuckle 61mm X X    
7103/1 uprights front X   X identically with touring car 1/5
6099 shock stay front X X    
8092 shock mounting shaft X X    
6104 wheel axle front X X    
8462/5 brake balancer X X   brake compatible when installed as a complete set
8462/4 bowden cable mount, short X X  
7428 plastic pinion 24T X X   outer diameter slightly different
7427 plastic spur gear 40T X X  
7071/2 plastic connector for stabilizer bar X X    
7035 engine mount, large     X engine position different
  engine mount, small       no corresponding part in a FG
3022 mounting pin for foam X X    
6106/2 wheel square <17mm X X   Carson +1,5mm/steel
6431 steel pinion 16T. X X    
7071 rear stabilizer bar 4mm X X   Carson +4mm/coated
8018 gas linkage Zenoah X X    
8017 brake linkage set X X    
8459/1 brake excenter shaft   X   length 1mm different
8458 brake disk X X   bore diameter 0.3mm different
8457/2 brake pad for disk brake X   X  
8116/1 3 chamber tuned pipe X X    
8475 adjustment screw for brake disk     X not compatible
8479 bushing for caliper X X   different material
6039 gear plate X   X  
8097 front bulkhead A X   X Complete FG front axle is a direct replacement for the Carson
8098 front bulkhead B X   X
8100 a-arm, front lower X   X
8100/1 a-arm, front upper X   X
6099 shock stay front X X  
7102 hinge pin front X X  
7103/1 upright front X   X
6104 front wheel axle X X  
6029/1 balljoint 10 mm X   X
         
8140 alloy brace for front axle X X  
6081/1 steel ball 5/10x15 X X  
8092 shock mounting shaft X X  
This comparison list was provided with greatest possible care, however we cannot guarantee for their correctness!
The optimal care of ball bearings

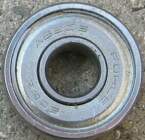
Unfortunately, it happens from time to time that we drive our 1/5 or 1/6 car on a wet, or in case of an off-road car even on a muddy track. :-( Even though it makes fun! If only the parts wouldn’t have to suffer! Especially the ball bearings take offense. Therefore bearing maintenance is very important after such a ride. Once the bearings are removed from the car the following procedure is recommended:

1 Shield / seal removal ...


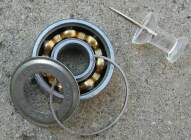
There are three common types of shields /seals
Version 1: metal lids with retainer ring.
Version 2: rubberized metal rings.
Version 3: press-fitted metal lids.


...or a combination of the three ...


Now you have to remove the shields. Depending on the version this should be done as follows:

Version 1:
Remove the retainer ring at the outer race of the bearing with a sharp needle, make sure to watch were the part flies, to be able to find it again ;-) The shield can then be easily removed with the needle.


Version 2:
Carefully pry the lid from the inner race side with a needle.

Version 3:
Pry only one lid with a small screwdriver and a dose of force. The lid should remain intact, so be cautious!

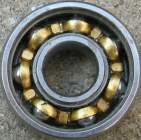
Now you can see the dirty inner workings of the open bearings.


2 Cleaning the bearing ...

Bearings are usually greased by default; the grease with dirt compound must be washed out completely. The following paragraph describes your next step when the bearings have been greased, not oiled!

Brake cleaner (No. y0042) is the solvent of choice for the job. Soak the bearings in a sealed glass container (i.e. an empty jam jar) that you shake every now and then and check periodically whether the grease is actually dissolved. Replacing the solvent from time to time is not a bad idea!

If the bearing is already seized, you may need a bigger hammer. Many times bearings are that dirty or even rusted, they do need some additional chemicals: WD-40 (No. y0749/01). Soak the bearing for some time in WD40 and move the races against each other by hand until they free up again. Now proceed as normal ...

If the bearings have been oiled and they are not yet seized (by dirt or rust), you can start right here: the oil and the dirt can be easily removed by short sets in hot water with detergent or neutral detergent and some shaking until the bearing turns without noticeable noises. Then the bearings are rinsed with clean water and dried as quickly as possible. This happens best in the oven on the lowest level or with a hair dryer.

In a perfect world you have now fresh and shiny looking bearings in front of you ...

3 Bearings re-lubrication ...

Now you have to grease or oil the bearings. The more the better is the wrong way! A few drops of Dry- Fluid Extreme (No. y0781) per bearing work wonders! Now you turn the bearings a little, until the dry fluid is evenly distributed.

About this "miracle cure" Dry-Fluid Extreme We did not think that today it’s still possible to make a real improvement in lubricants! Give it a try!

4 Re-seal the bearings and re-install them ...

Now the bearings must be re-sealed. Numbering as above:

Version 1: Put the lid back in place and fumble the snap ring with a needle into the groove in the outer race.

Version 2: Put the lid back in place and press it down slightly, it should snap automatically into the groove.

After the dry-fluid treatment you will ask more from your brake! ;-)

Find the best brakes: http://rc-car-online.de/shop/en/243-brake.html

We thank Mr. Michael Sautter, who provided most of this tutorial.

Here is the setup for your FG Formular 1 Sportsline


Before the model is adjusted and measured, it should be ensured that all rotating parts run smoothly (ball bearings, ball joints, drive axles, servo saver...)


We recommend for the adjustment the camber gauge FG number 8540.

Then, setup will start at the rear suspension:
  1. Setting toe-in
  2. Setting camber (Please note that on a Formula toe-in is adjusted in conjunction with camber)
  3. Suspension droop adjustment
  4. Stabilizer hardness adjustment
  5. Stabilizer play adjustment


Adjustment rear axle:
  • Toe-in: 3°
  • Camber: -2.5°
  • Droop: 12 mm
  • Ground clearance: 10 mm (ride height)
  • Progressive spring short FG 10193 in rear
  • Shock oil: 5000
  • If present stabilizer (rod extends 10 mm from shaft) FG 10480
  • Differential open standard with lots of grease, tuning differential (2-fold, 4-fold or Powerlock)


Proceed with the same steps on the front suspension. However, make sure that the wheels are aligned perfectly straight (servo saver)!

Adjustment front axle:
  • Droop: 3 mm
  • FG progressive yellow spring FG 10192
  • Shock oil: 4000
  • Camber: 1° (positive)
  • Stabilizer hard (rod completely retracted into shaft) FG 10480
  • Toe-out: 8 mm (or 2 degrees)
  • Caster: 6 mm
  • Ground clearance 9 mm (ride height)


At the end of the adjustment mount the wheels you’ll run and adjust ride height. (droop gauge recommended with the order number 50160200)

We Recommend an Outstanding grip and traction to get the tires from the Roadies series.
Replacing the pins on DBXL drive shafts LOS252001, LOS252021, LOS252019:

  • Remove set screw completely
  • Open bench vise until the pin just fits between the jaws
  • Position shaft on vice, held by a second person if necessary
  • Drive pin out with light hammer blows using a pin punch or a suitable comparable tool
  • If Loctite was excessively used in the assembly, heating the shaft end may be required. Depending on the thread locking compound, you will strive for a value of 200 - 300°C. The shaft end must not be annealed! An annealed pin will mushroom on impact and make it very difficult to drive it out if not impossible.
  • When installing the new pin from set LOS252020 make sure that the flat section of the pin is positioned under the set screw. The set screw should be just slightly tightened against the pin using high strength thread locker (link). Firm tightening puts the pin under preload and increases the risk of breakage!
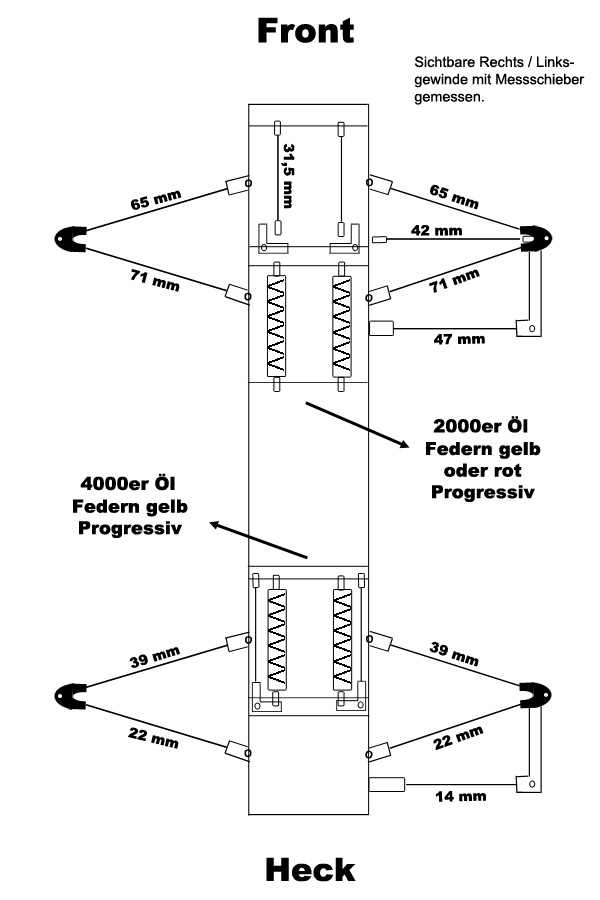
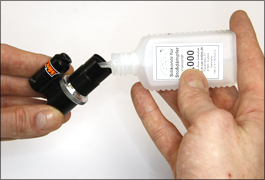
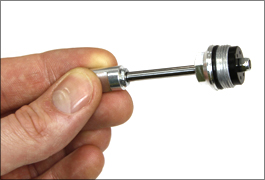
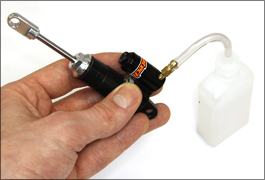
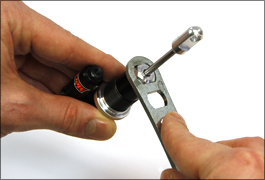
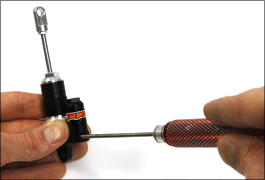
Lose the lower nut of the shock by means of a screw-wrench. Screw off the lower nut completely from the sock housing. Check whether both bleeding screws are locked.
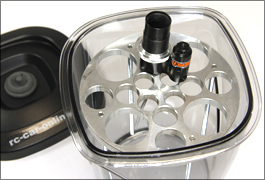
Fill in the silicon oil till half of the inner thread of the shock housing. Wait until all air bubbles are gone. Before you fix the lower nut make sure that the shock shaft is completely extended.
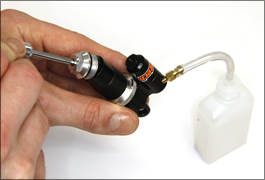
Before you fix the lower nut again you have to replace one bleeding screw by a bleeding nipple with tube. Screw on the lower nut completely. Pay attention that the nut is fixed straight, other wise the thread can be damaged. Tight the nut by means of a screw- wrench.

Remove the bleeding nipple with tube and close the shock by means of the bleeding screw. Remove the bleeding nipple with tube and close the shock by means of the bleeding screw. Now you can test whether the shock is free of air. If you press in the shock shaft and you feel a “hole”, means when the shaft can be moved a little without resistance there is still air in the shock. In this case you need to repeat the procedu- re. Maybe there was not enough oil in the housing which leads to an air buffer between the oil and the shock piston plate.
As in "full-size motorsport," tire choice is crucial, even with the RC cars.
With the "wrong" tires, it just doesn’t make fun! No Grip or -sometimes even worse - too much grip at the "wrong" axle ensures that driving literally falls by the wayside!

Massive oversteer, which means the car turns in more than according to the driver’s command (or even worse when the car is not able to keep a straight line) or understeer, where the car turns in less than according to the driver’s command, can spoil the joy of RC cars.

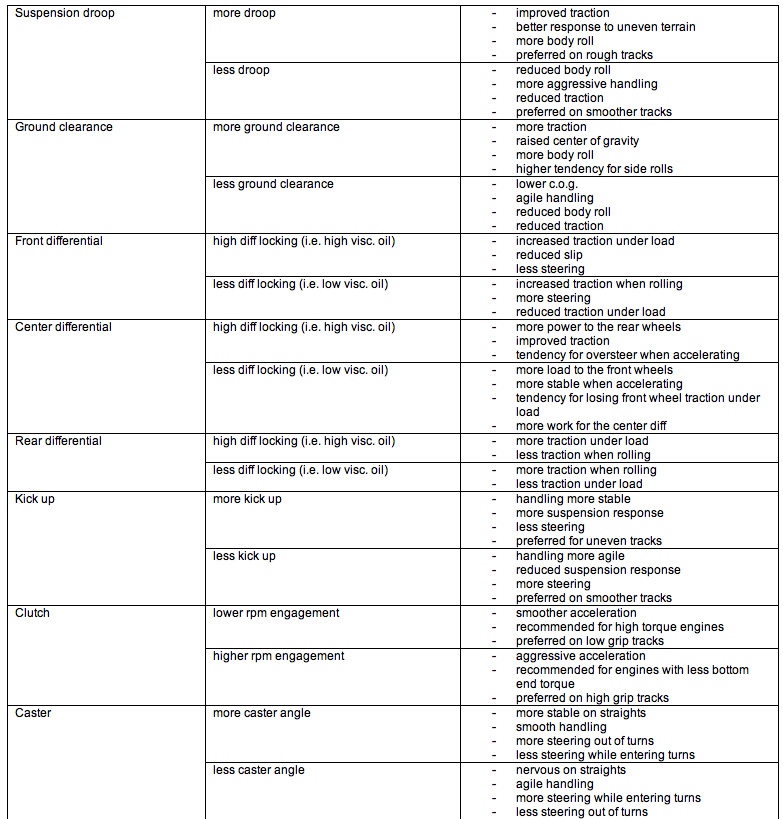
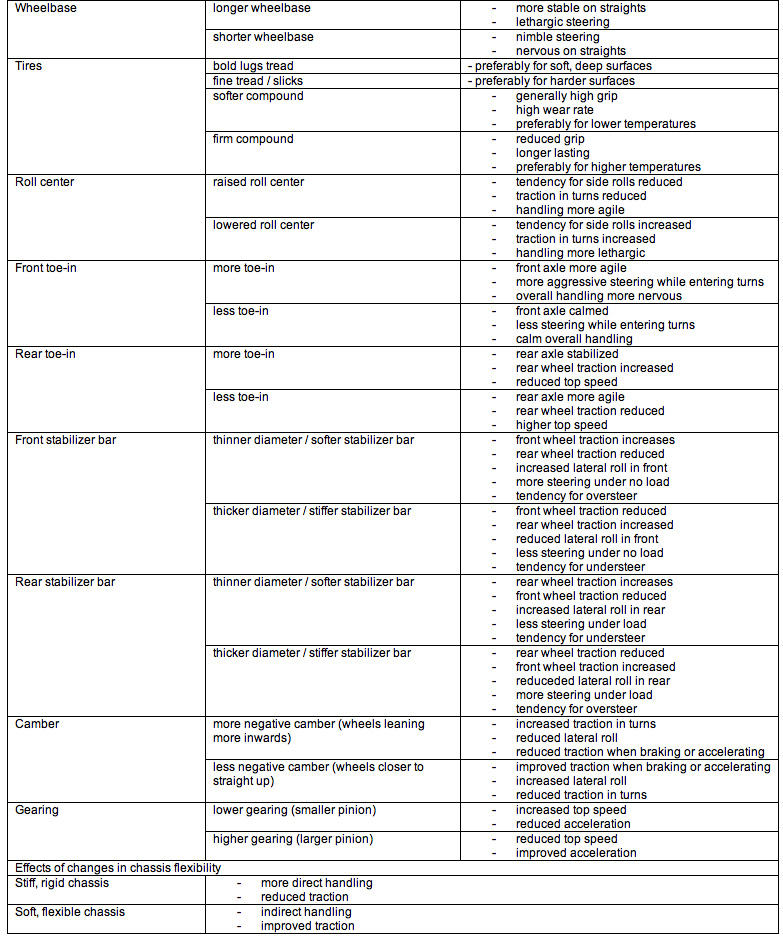
This can be influenced with various suspension settings, but the single most effective factor is the "right" choice of tires.

Additionally, the personal preferences must be taken into account. Some drivers prefer a car with a slight tendency for oversteer and others prefer a car with a slight tendency for understeer. It’s the dose that makes the poison.

Usually the second option is recommended especially for the not so experienced driver.

For off-road cars tire choice is even more difficult than for street cars!

As a good starting point you narrow your choice depending on the track’s surface such as tarmac, carpet / turf (nowadays common on many off-road race tracks), compacted and smooth clay soil, loose topsoil, grass and sand. Many times the track provides a mix of surfaces and you have to find an acceptable compromise!

As a general rule, just like with street tires, a softer compound increases traction while staying with the same tread design.

Custom trimming of the tire tread is very important with off-road tires. A deep gnarly tread usually gives good propulsion which is great most of the time. But, depending on the terrain, it can be very annoying when big strong lugs on the tire’s shoulder, provide so much grip in turns that the car traction rolls; and according to Murphy’s comes to a rest on the roof like a turtle on its back.

This tendency for traction rolls can be greatly influenced by cutting or trimming the outer lugs. And especially with the front tires.
A good, sharp diagonal cutter or good curved and strong sharp scissors can be very helpful.

There are also surfaces like loose sand, or even a hard clay soil, where a coarse tread, which due to the nature of the terrain, does not lead to traction rolls is useful for propulsion and traction during turns. Therefore cutting or trimming the outside of the tread is no panacea.

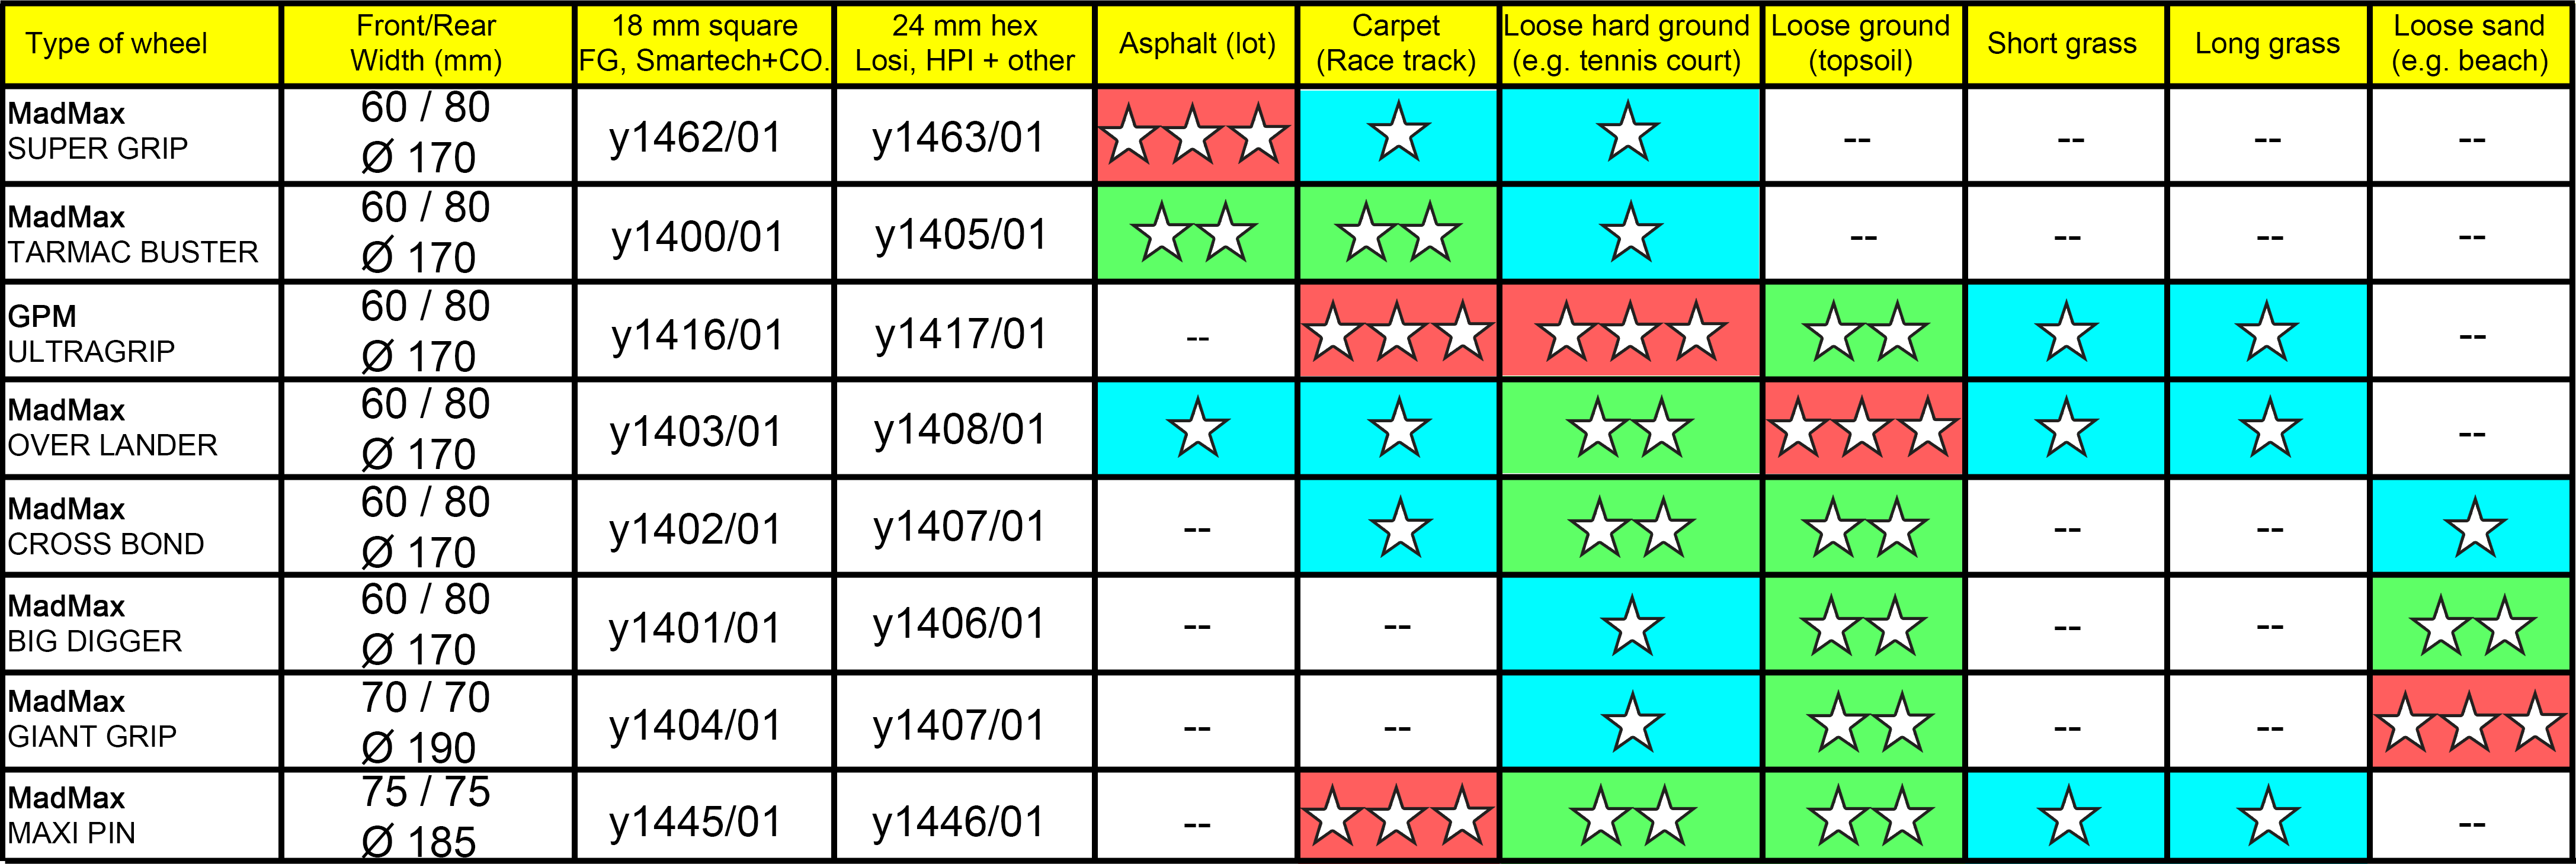
The strength of the rim is also very important. The more aggressive the tire tread; the bigger the load on the rim and especially the wheel drive socket, placing high demands on the impact resistance of the outer ring and the beadlock. The MadMax Extreme rim meets these requirements 100%! There is no more durable rim!

The following table of MadMax tires should make it easier to chose the "right" tire:


The setup of our specialists Günter Honert.

Front suspension:

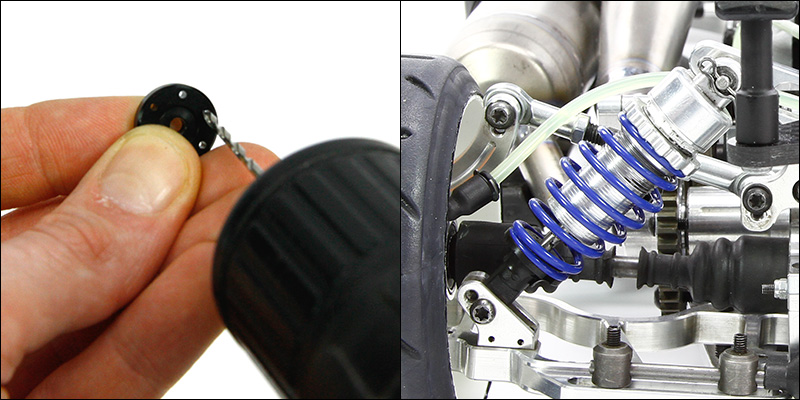
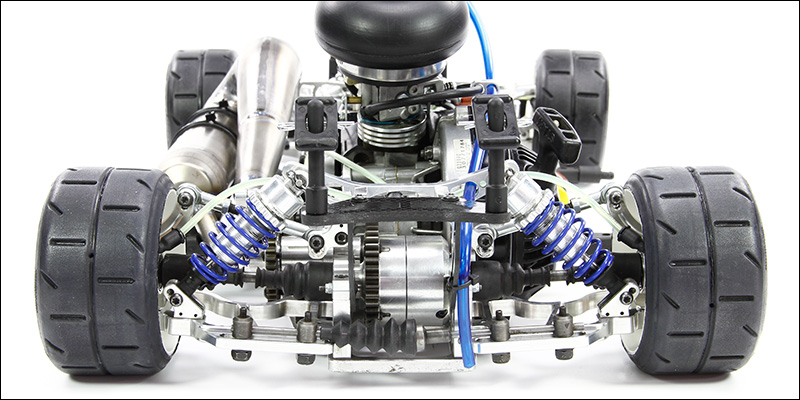
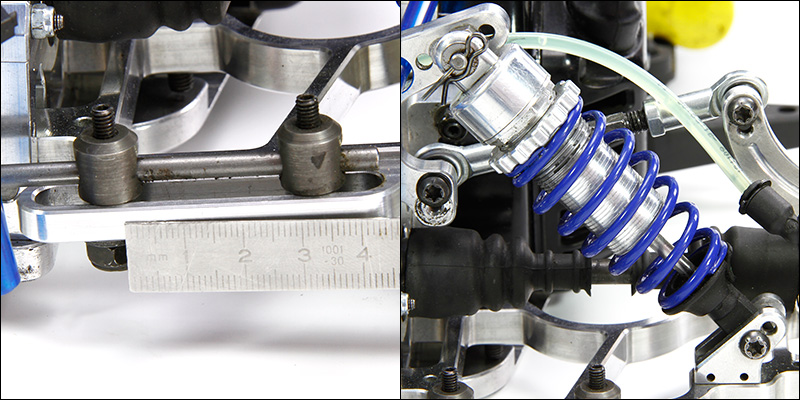
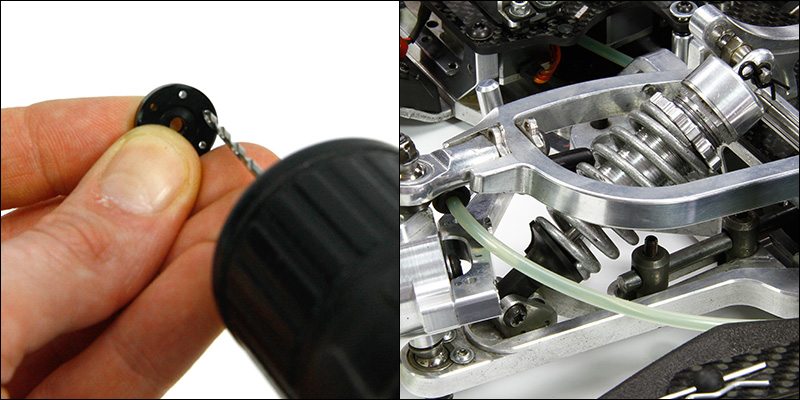
Drill the damper piston to 1.6mm and fill the shock absorber with 8000 viscosity silicone oil. The shock absorber should be installed completely horizontally and equipped with a yellow spring. In case of a high grip track the silver spring is recommended.

For the caster two small clips (FG 7100) are installed in the rear portion of the hinge pin.
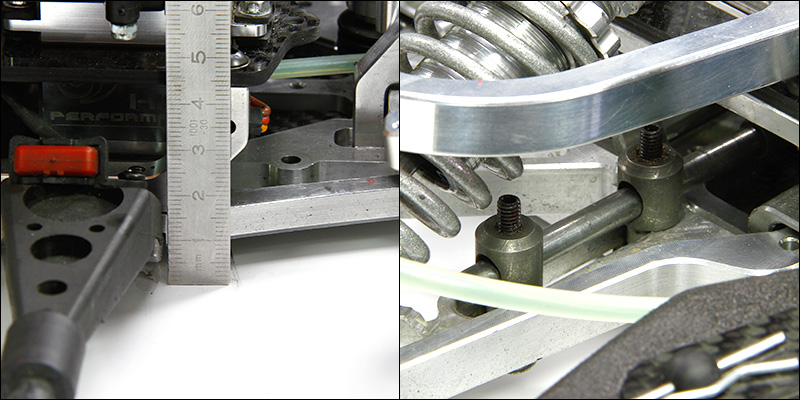
Axle shaft height should be 50 mm, measured from the top of the shaft to the ground. The easiest way to measure it with a caliper.

Chassis height approx. 7 mm. Adjust the toe-out to 1 degree and the camber to 0 degrees.

Adjust stabilizer bar to very hard, i.e. push the inner mounts entirely inward.
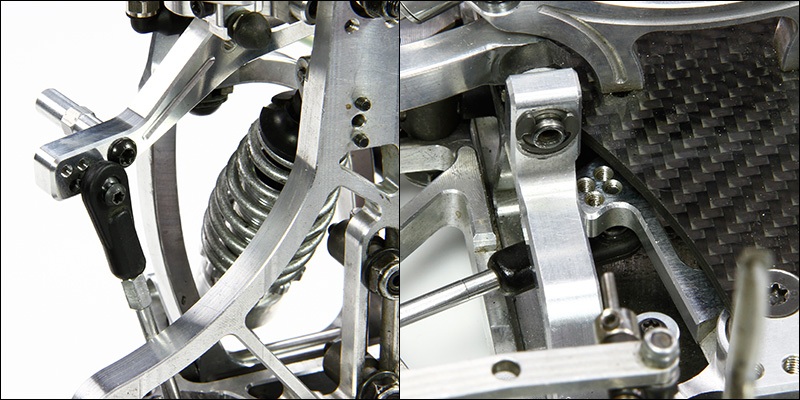
Servo Saver / steering arm - tie rod into the very outside hole / top side.
Servo Saver / tie rod - tie rod in the hole at the bottom / inside.

Adjust the servo saver to very hard, so push the inner mount completely inward.


Rear suspension:

Drill the damper piston to 1.6 mm and fill the shock absorber with 6000 viscosity silicone oil. The shock absorber should be installed completely horizontally and equipped with a blue spring.
Measurement from top of the wheel shaft to the ground should be approx. 44 mm. Adjust the toe-in to 2.5 degrees and the camber to 1.5 degrees, measured normal; so briefly push the car down and let it rebound.

Chassis height 9 mm.
Adjust the distance between the stabilizer bar bolts to 25 mm.

Install the wishbone at the top hole of the upright. At the differential side the wishbone is also installed in the upper hole.

Set the clutch to 9,800 RPM. Best done just after starting the engine, because engagement speed will drop to about 9,000 RPM once the engine is warmed up. So either go for 9,800 RPM with a cold engine or 9,000 RPM with a warm one.

Series and parallel connection of batteries/rechargeable batteries


Series circuit

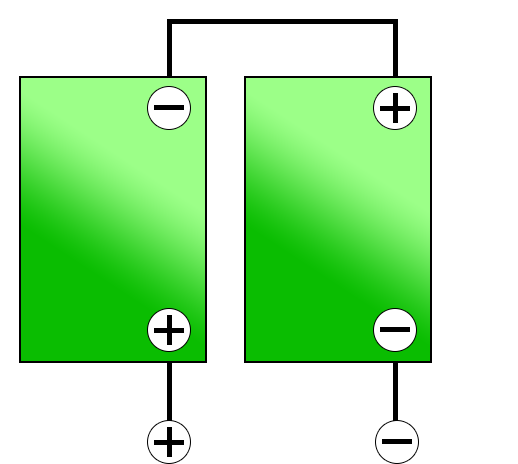
With the so-called series connection the operating voltage is increased.
How batteries are connected in series:
The negative pole of one battery is connected to the positive pole of the other batteries, so that all batteries are passed through by the same current.

The voltage of the two batteries thus adds up together. Switching the batteries together is also referred to as "series connection".    
Example:
If two rechargeable batteries with 4,000mAh (milliamp hours) and 11.1 Volt each are connected in series, the output voltage is 22.2 Volt and the capacity is 4,000mAh.

Advantages and disadvantages:
With a series connection of the batteries, higher total voltages are generated. The disadvantage, however, is that the weakest battery affects the performance of the series. If one battery is defective, the series connection will not work. As a rule, only batteries of the same manufacturer, type and construction technique can be connected in series.


Parallel circuit

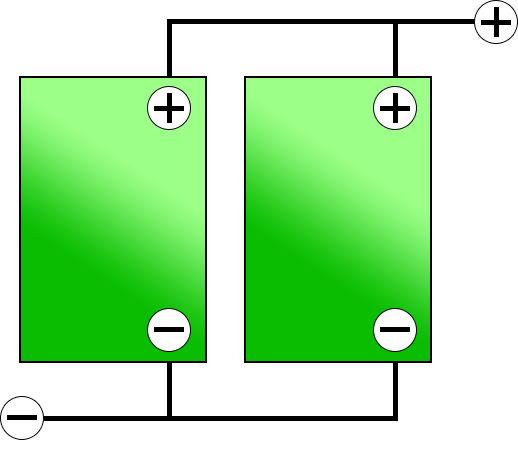
The battery capacity increases with parallel connection (or voltage divider circuit).
How to connect batteries in parallel:
The positive pole is connected to the positive pole and the negative pole to the negative pole. The charging capacity (mAh) of the individual batteries adds up.

It is important to note that only batteries of the same voltage and charge state can be connected in parallel.  
Example:
If two rechargeable batteries with 4,000mAh and 11.1 Volt each are connected in parallel, the resulting output voltage is 11.1 Volt and the total capacity is 8,000mAh.

Advantages and disadvantages:
Parallel connecting can increase the performance and service life of the batteries. Nevertheless, the charge control of batteries connected in parallel is not uncomplicated, as each battery also ages and thus represents a potential source of error. Therefore, it may be advantageous to use one large battery instead of several small batteries. If a parallel connection is to be made, however, make sure that the batteries of the same type, capacity, age and state of charge are connected in parallel, as is the case with series connection.
After the conversion all PMT and GRP competition tires with 18mm square can be used


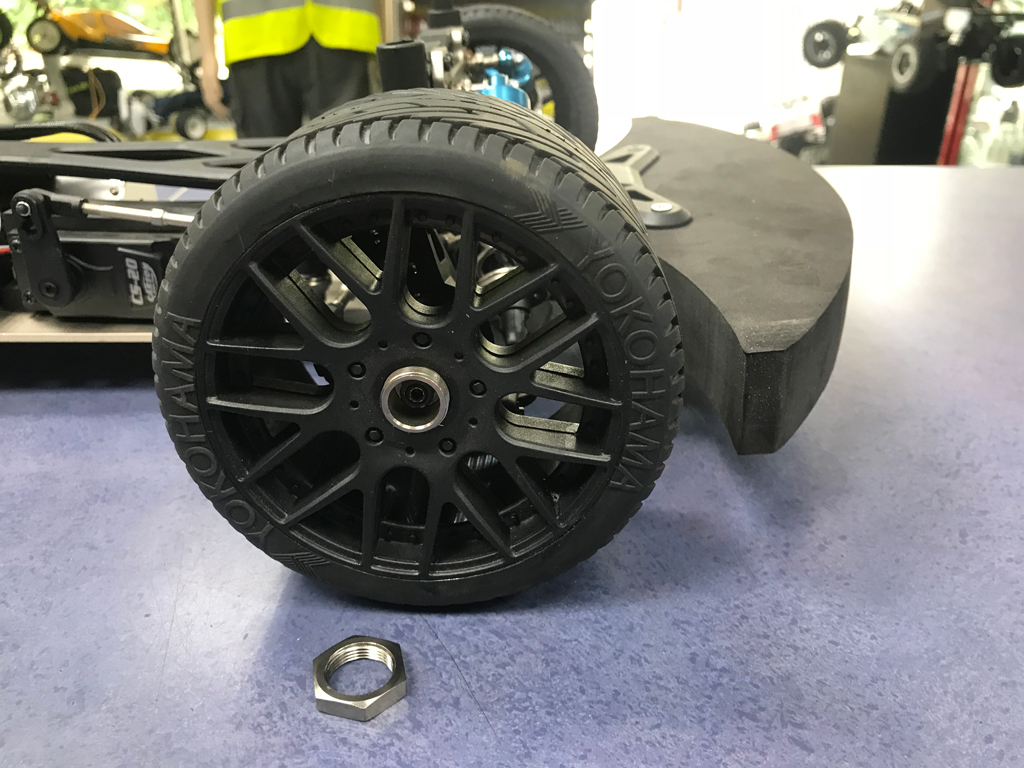
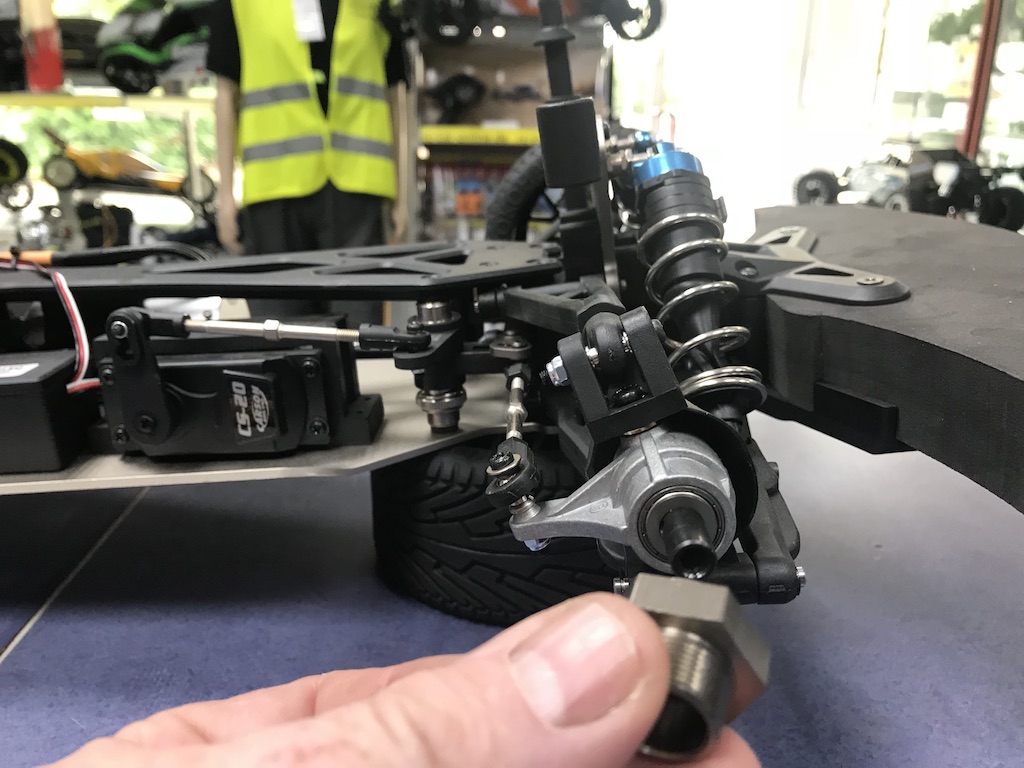
1. Remove stock wheel nut and wheel.


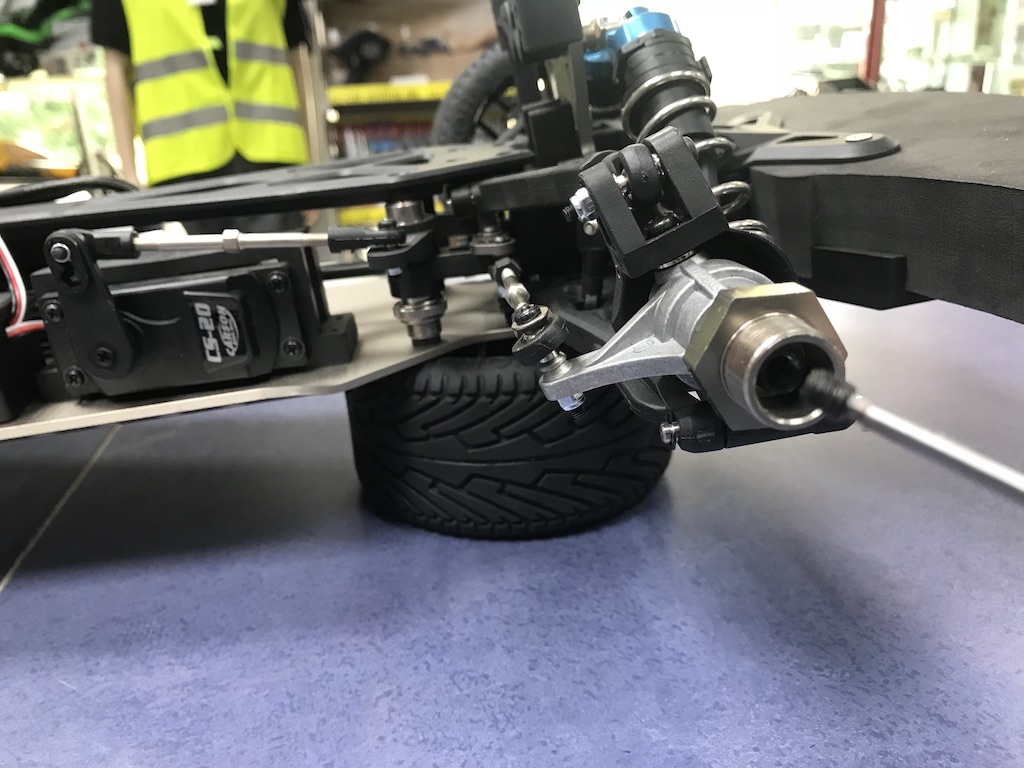
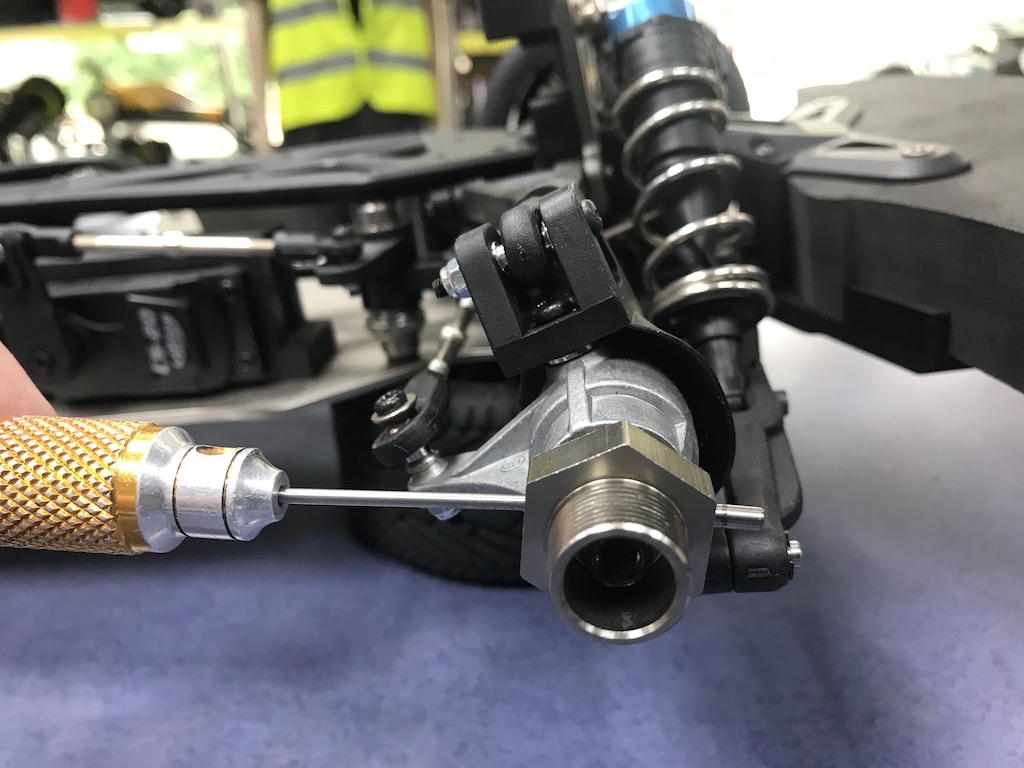
2. The stock 22 mm hexagon adapter must be removed. Remove the grub screw from the wheel shaft with a 2.5 mm Allen key.


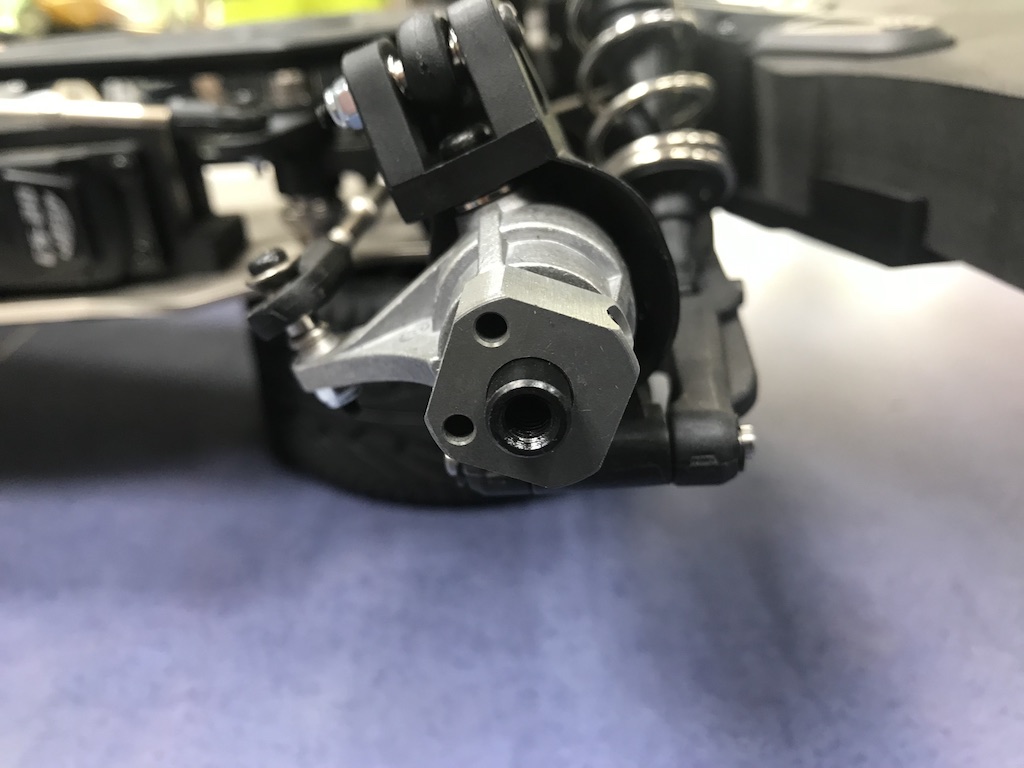
3. Now the steel pin can be pressed out of the hex adapter. Remove the hex adapter from the wheel shaft.


4. Slide the new 18mm square drive y6107 onto the wheel shaft and tighten with the grub screws. If possible, flatten the area where the grub screw contacts the shaft with a file or a Dremel for better torque transfer.


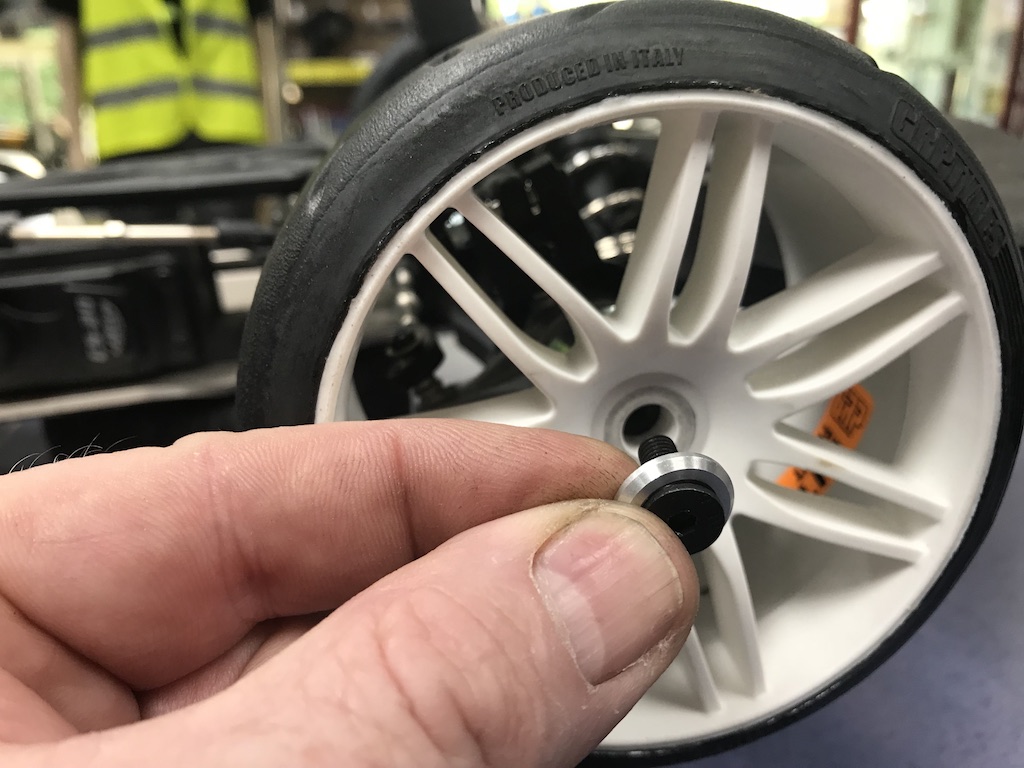
5. Now you can install the new GRP or PMT wheel onto the square wheel drive. Finally, tighten the wheel with a large aluminium washer FG 6038 and a countersunk head screw M5x16mm. Use a little bit of thread locking compound to keep the screw in place.

The conversion increases track width by about 12 mm.
The easiest way is to do the test with two people.

Before the test:

Make sure that you are not in the vicinity of high voltage lines, these can significantly affect the transmitter performance and/or the signal.

First test without engine running

Just turn on the electronics of the vehicle and slowly increase the distance between yourself with the remote control and the car. Move steering and throttle while you walk. The second person will check that the car is working accordingly. Should you reach a distance of about 100 meters without any interference, everything is fine and you can do the second test with the engine running. If you do notice malfunctioning and your servos don’t work as they should, try the following:
  • Without the engine running check all connectors for tight and proper fit!
  • From a raised position: make sure you stand high like on two stacked crates of beer or a park bench.
  • Change your location: perhaps there is a source for interference in the surrounding area which is not directly recognized.
  • Battery change: a defective cell in the battery can be a source of interference.
If interference still occurs, it can only be caused by the transmitter or receiver. With a 2.4 GHz remote control, try re-binding the transmitter with the receiver!

With the engine running

Just turn on the electronics of the vehicle and slowly increase the distance between yourself with the remote control and the car. Move steering and throttle while you walk. The second person will check that the car is working accordingly. Should you reach a distance of about 100 meters without any interference, everything is fine. If you do notice malfunctioning and your servos don’t work as they should, try the following:
  • Grinding parts: check whether due to the vibrations of the engine there is something vibrating on the vehicle which is not intended to do so.
  • Metal wiping on metal: should be avoided if possible.
  • Spark plug cap: check for tight and secure fit. If it seats normally, you can add a cable tie as an additional precaution to prevent it from coming loose. Otherwise replace if necessary.
  • Spark plug: Even when igniting properly, radio interference suppression may have decreased; it could be a source of error - try another one.
These are all just contingencies which can occur and there’s no guarantee that the fault will be found. If you struggle in vain, please contact us and we will try to solve the problem together with you.
1. Deinstall the clutch
2. Place the clutch in the clamping block, # 5445/1.
3 Lift the front plate of the clutch with a slotted screwdriver until the pins no longer engage in the front plate.
4 Insert the wrench # 5445, into the front plate.
5 Now turn the front plate with the wrench and change the preload of the clutch springs to position A, B, C or D. After completion, snap the cover plate back onto the pins.
6. Reinstall the clutch.


Engaging points and their meaning:
A - means low RPM engagement
D - indicates higher RPM engagement
"C" is short for capacity, i.e. the capacity of the battery in Ah.
If a battery has a rating of 25C, it can theoretically provide 25 times its capacity as a constant load. "Theoretically" because this does not mean continuously from full to empty, but over a period of e.g. 10 seconds. The peak load, which is usually twice as high, may only be applied for fractions of a second in comparison.

C-rating and capacity must also be seen in context in each case. If the capacity of a battery is high, its C-Rating does not have to be as high as that of a battery with smaller capacity in order to achieve the required absolute number of load capability.

Conversely, using a battery with a high C-rating for low current applications is also casting pearls before swine, since for a given capacity, increased C-rating usually means increased price and weight, and sometimes dimensions as well.

Therefore a 50C-rated receiver battery makes relatively little economic sense, but is technically trouble-free. A too small/weak drive battery, on the other hand, will very quickly swell up and be destroyed. If you buy cheap, you buy twice.
Loading...
Upload in progress, please be patient ...
Shopware-Agency Shopware-Plugin Development